

How Do You Plant Peony Roots
Written with AI assistance, edited and checked against horticultural sources.
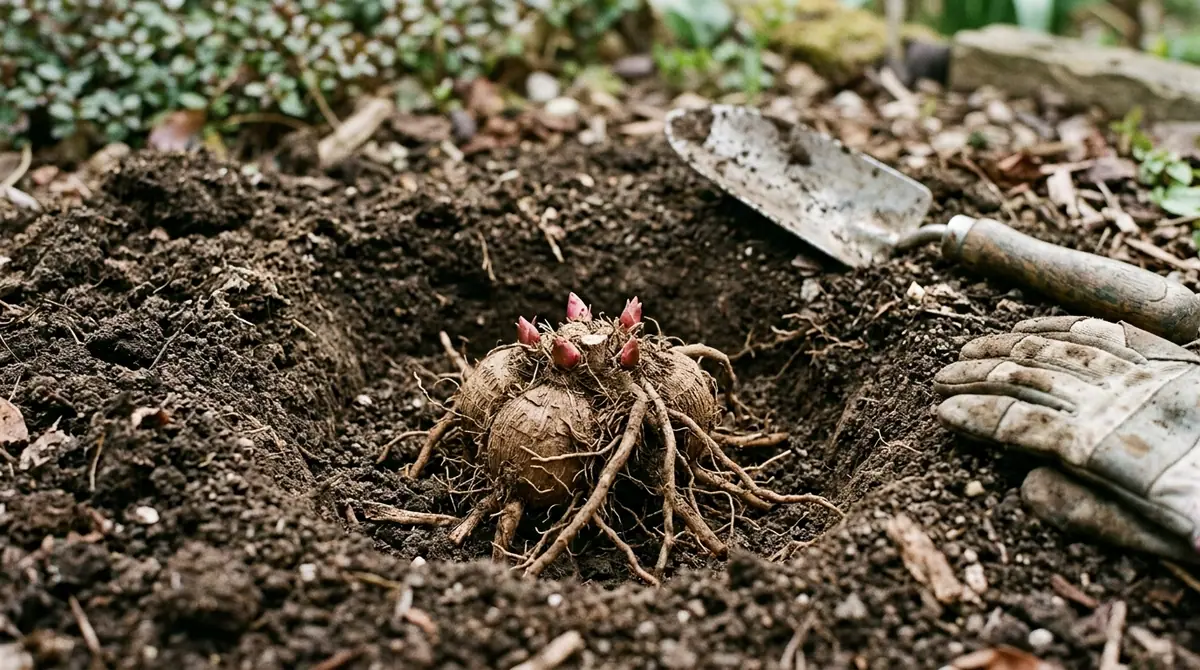
I stood in the biting October chill of trial gardens in zone 6b, holding a bare-root Paeonia lactiflora that looked less like a future floral masterpiece and more like a bundle of calcified sweet potatoes. Three years earlier, a gardener had handed me a box of similar dormant roots with a panicked plea because her previous batch—planted two inches too deep by a landscaping crew—had produced magnificent, lush foliage year after year without a single blossom. That afternoon, knife in hand, I carefully inspected the pink eyes clustered near the crown, ensuring every millimeter sat precisely 2 inches (5 cm) below the soil surface. Two springs later, that stubborn clump erupted into fifty fragrant, dinner-plate-sized coral blossoms. Understanding how do you plant peony roots is entirely about respecting these precise underground mechanics, turning what looks like dead timber into a decades-long perennial legacy.
1. Botanical Overview & Natural Habitat

Unlike many garden perennials that prefer tropical dampness, peonies evolved in continental climates characterized by cold winters and warm, dry summers. This evolutionary history dictates their strict requirement for a chilling period, known as vernalization. Herbaceous peonies typically require between 500 and 1,000 chill hours—temperatures between 32°F and 40°F (0°C and 4.4°C)—to break bud dormancy and trigger floral development. Without adequate winter cold, the physiological signaling cascade that initiates flower buds fails entirely, resulting in blind stems.
In a landscape design context, peonies function as monumental structural elements. Their deeply lobed, glossy green leaves provide exceptional foliage texture from April through October, far outlasting their fleeting 7-to-10-day bloom window in late spring. Because they despise root disturbance and can live productively for 50 to 100 years in the same location, selecting the right cultivar and planting site is an irreversible commitment. When planning your perennial borders, remember that while you might also be mapping out vegetable schedules like When to Plant Brussel Sprouts in Zone 7 for your seasonal kitchen garden, long-lived woody and herbaceous ornamentals like peonies demand a permanent, undisturbed architectural placement.
2. Essential Environmental & Care Requirements
To keep peonies thriving for generations, you must match their native ecological niches regarding sun, soil drainage, and air circulation. Sun exposure is non-negotiable; peonies require a minimum of 6 to 8 hours of direct, unfiltered sunlight daily. Shaded planting sites cause weak, etiolated stems that flop under the weight of heavy blossoms and invite fungal pathogens like Botrytis.
Soil composition is the second critical pillar. Peonies demand soils with exceptional drainage, ideally a rich, loamy texture amended with organic matter. They tolerate a wide pH range from 6.0 to 7.0 but falter immediately in waterlogged clay that holds winter moisture. Standing water around the tuberous roots promotes crown rot (Phytophthora species), which can kill an established plant in a single season.
| Parameter | Optimal Condition | Common Mistake | Why It Matters |
|---|---|---|---|
| Sunlight | 6–8+ hours of direct sun daily | Planting in partial shade or under tree canopies | Reduces flower production and increases susceptibility to fungal diseases |
| Soil Drainage | Loamy, well-amended, neutral pH (6.0–7.0) | Heavy, compacted clay retaining standing water | Waterlogged roots quickly succumb to fatal crown and root rots |
| Planting Depth | Eyes positioned 1.5 to 2 inches (3.8–5 cm) deep | Burying roots 4 to 6 inches deep | Deep burial prevents the chilling requirements and stops flower bud formation |
| Watering | 1 inch (2.5 cm) of water weekly during establishment | Frequent, shallow sprinkling | Encourages weak surface root development rather than deep anchorage |
| Spacing | 3 to 4 feet (0.9–1.2 m) apart | Crowding plants closely together | Restricts vital air circulation, trapping humidity and triggering botrytis blight |
Air circulation is equally vital. Planting peonies too close to solid walls or dense shrubbery traps ambient humidity around the foliage. This microclimate creates an ideal breeding ground for fungal spores. Maintain a generous spacing of 3 to 4 feet (0.9 to 1.2 m) between individual plants. If your garden layout incorporates intensive food production alongside ornamentals—perhaps experimenting with root crops using guides like When to Plant Beets in Utah—ensure your vegetable rows do not encroach upon or shade the essential perimeter of your peony bed.
3. Step-by-Step Cultivation, Feeding & Propagation
The absolute best time to plant bare-root herbaceous peonies is in the autumn, specifically between September and November depending on your hardiness zone. Fall planting allows the root system to establish fine feeder roots in cooling soil—typically between 50°F and 60°F (10°C and 15.6°C)—long before top growth initiates in spring. Spring planting is possible with potted nursery specimens, but bare roots planted in spring suffer severe transplant shock because they must simultaneously grow roots and stems in warming weather.
💡 Pro-Tip: When unboxing bare peony roots, look closely at the pink or white embryonic buds (called "eyes"). If your garden soil naturally settles heavily over winter, position those eyes slightly closer to the surface—around 1.5 inches (3.8 cm) deep in heavy loam—to compensate for natural soil compaction.
Follow this meticulous 8-step protocol for planting bare-root herbaceous peonies:
- Select and Inspect the Root: Choose a firm, disease-free bare root featuring 3 to 5 distinct, plump pink eyes and several healthy, thick storage roots. Reject roots that feel spongy, water-soaked, or show signs of galls.
- Prepare the Planting Hole: Dig a hole 2 feet (61 cm) wide and 1.5 to 2 feet (45 to 60 cm) deep. Peonies require loose soil to encourage rapid root penetration during their first autumn underground.
- Amend the Substrate: Mix the excavated native soil with a 3-inch (7.6 cm) layer of well-rotted compost and 1 cup of bone meal or low-nitrogen, high-phosphorus organic fertilizer (such as a 5-10-10 blend) to fuel root development.
- Create a Soil Mound: Shovel a portion of the amended soil back into the center of the hole, shaping it into a firm cone to support the base of the root system.
- Position the Root: Place the peony root atop the soil mound, draping the storage tubers downward along its slopes. Crucially, adjust the height so the top eyes sit precisely 2 inches (5 cm) below the finished surrounding soil grade.
- Backfill and Firm Gently: Fill in the remaining soil around the roots in stages, tamping down gently with your hands—never your boots—to eliminate large air pockets without compacting the delicate structure.
- Water Deeply: Deliver a deep, saturating soak of 1 to 2 inches (2.5 to 5 cm) of water to settle the soil particles intimately around every contour of the storage roots.
- Apply Protective Mulch: Cover the soil surface with a 2-inch (5 cm) layer of shredded hardwood bark or pine straw to insulate the crown against extreme freeze-thaw cycles through its first winter. Remove this mulch layer carefully in early spring before green shoots emerge.
Propagation is primarily achieved through root division rather than seed, which can take up to eight years to produce true-to-type flowers. Dig up an established clump that is at least 5 to 7 years old in early autumn. Wash away the clinging soil with a gentle garden hose to reveal the structural eyes. Using a sharp, sterilized hori-hori knife, slice the crown into distinct sections, ensuring every division retains at least 3 to 5 robust eyes and a generous share of fleshy storage roots. For those balancing multiple garden projects, such as tracking vegetable timings like When to Plant Beets in Kansas, scheduling your peony divisions for mid-autumn ensures the weather remains cool enough to prevent moisture stress on the freshly cut tubers.
4. Common Problems, Pests & Troubleshooting
Even with careful cultivation, peonies occasionally signal distress through foliar discoloration or structural failure. Diagnosing these symptoms early saves the plant from permanent decline.
- Botrytis Blight (Botrytis paeoniae): This is the most common fungal disease affecting peonies. Young shoots turn brown and rot suddenly in spring, or dark brown blotches appear on leaves and stems during wet, humid weather. Cut infected stems 2 inches (5 cm) below the soil line, dispose of all debris in the trash (never compost diseased tissue), and apply a copper-based fungicide or bio-fungicide containing Bacillus subtilis.
- Leaty Stem Nematodes: These microscopic roundworms cause distorted, stunted growth and wavy, narrow leaves that fail to open properly. There is no chemical cure; infected plants must be entirely dug up and destroyed to prevent spreading through the soil matrix.
- Failure to Bloom (Blindness): If a mature peony produces lush foliage year after year without a single flower, investigate three primary culprits:
- Planting Depth: The roots were buried deeper than 3 inches (7.5 cm). Lift and reposition the crown in autumn.
- Excess Nitrogen: Heavy applications of lawn fertilizers stimulate green leafy growth at the expense of flower buds. Switch to a phosphorus-rich amendment.
- Insufficient Sunlight: Surrounding trees have matured, casting too much shade. Transplant the peony to an unshaded location.
⚠️ Important Caution: Never apply high-nitrogen synthetic fertilizers to your peonies in early spring. Nitrogen prompts a massive surge of soft, succulent foliage that is exceptionally vulnerable to fungal attacks and prone to collapsing under spring rainstorms. Stick exclusively to balanced, slow-release organic fertilizers or rock phosphate applied in autumn.

5. Frequently Asked Questions
What happens if you plant peony roots too deep?
Planting peony roots deeper than 2 inches (5 cm) below the soil surface prevents the crown from experiencing the vital winter chill hours needed to break bud dormancy. While the plant will typically produce vigorous, healthy green foliage year after year, it will remain entirely blind, failing to form flower buds or produce blooms. To fix this, carefully lift the entire clump in early autumn and reset it higher in the soil profile, ensuring the pink eyes sit strictly at the 1.5 to 2-inch (3.8 to 5 cm) mark. For further horticultural guidelines on perennial performance, consult the Royal Horticultural Society.
When is the exact best time of year to plant peony roots?
The absolute best time to plant bare-root peonies is in the autumn, specifically between September and November. During this window, soil temperatures remain warm enough—typically 50°F to 60°F (10°C to 15.6°C)—to encourage new feeder root development, while cool air temperatures allow the plant to direct its energy downward without top-growth stress. Planting in autumn ensures the root system establishes a strong foundation before entering winter dormancy.
Do newly planted peony roots flower in their first year?
Rarely. First-year bare-root peonies focus almost entirely on establishing their complex underground root systems and storing carbohydrates. If a flower bud does form during the first spring, it is often best practice to pinch it off manually. This redirects the plant's limited energy into robust root and foliage development, guaranteeing an abundant, high-quality flower display by its third growing season.
How do you divide an overgrown peony clump?
To divide an overgrown peony, wait until early autumn when the plant enters dormancy. Carefully dig around the entire root zone with a spade, lifting the heavy tuberous mass out of the soil. Gently wash away clinging dirt with a garden hose to reveal the pink embryonic eyes. Use a sharp, sterilized knife to cut the crown into sections, ensuring every single division retains at least 3 to 5 healthy eyes and several thick storage roots. Replant the divisions immediately at the standard 2-inch (5 cm) depth. For authoritative research-based regional recommendations on perennial propagation, check resources provided by University of Minnesota Extension.
Related Guides
- Peony in Containers
- Can Peony Be Planted in Pots
- Tree Peony Seeds
- How to Grow Peony Seeds
- What Does a Peony Seed Look Like
📋 Table of Contents ▼ Click to expand
Tags:
Keep reading
🌿 Related Plants You Might Like






PlantSavvyWorld
Editorial team
PlantSavvyWorld is an independent botanical education project. Articles are drafted with AI assistance, then edited and checked against university extension services, botanical garden collections and other published horticultural sources.