

Natural Stone Garden Edging
Written with AI assistance, edited and checked against horticultural sources.
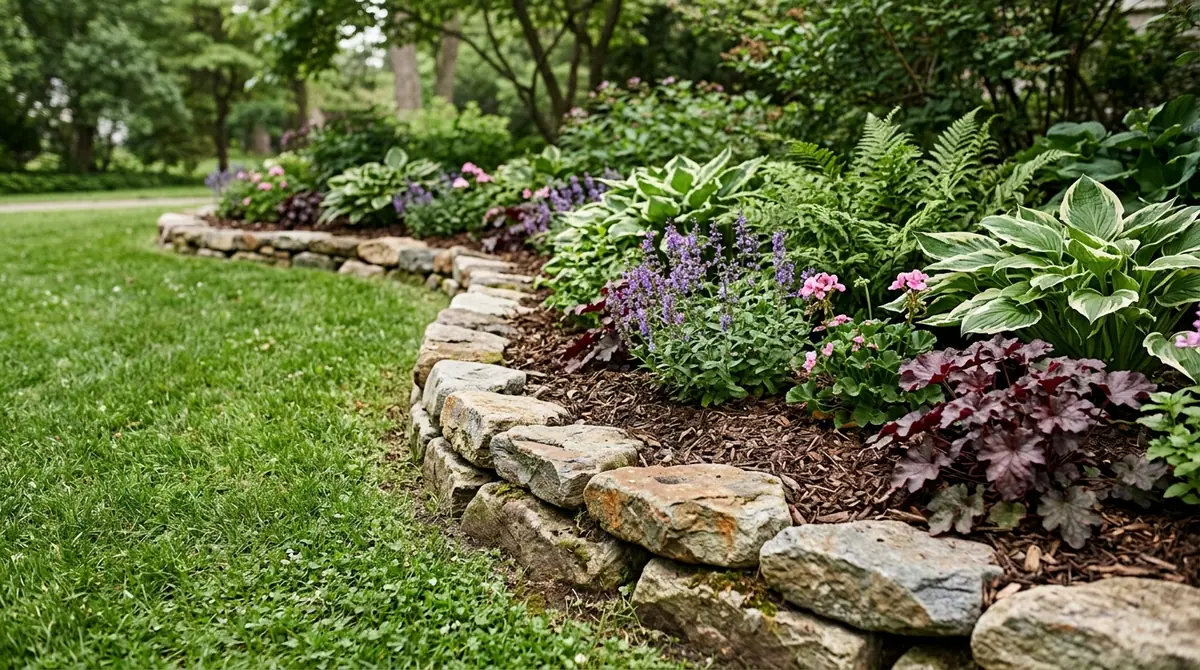
Natural stone garden edging serves as a geological anchor for the landscape rather than merely a design line; burying flagstone bases 4 inches (10 cm) deep into the earth creates a crisp, permanent boundary that prevents mulch from washing over Thymus serpyllum collections during heavy rains of 2 inches (5 cm) or more.
1. Botanical Overview & Natural Habitat

Understanding this native ecology changes how we deploy natural stone in a designed garden. Stone does not just separate a lawn from a flower bed; it absorbs solar radiation during peak daylight and radiates warmth back into the surrounding root zones long after the ambient air temperature drops below 55°F (13°C). This thermal mass protects sensitive root crowns during volatile shoulder-season freezes.
Furthermore, stone edging acts as a hardscape transition zone that influences soil moisture dynamics. Porous sandstones and limestones wick moisture laterally, while dense granites and schists act as absolute moisture barriers. When pairing plants with your natural stone edging, you must account for this geological context. For instance, if you are designing a perennial border alongside a wild food production system—much like what you would establish when learning how to grow a wild food forest self sufficiency garden—the stone edge serves to retain valuable compost and mulch within the guild while preventing aggressive turf grasses from invading your productive perennial layers.
2. Essential Environmental & Care Requirements
Installing natural stone garden edging requires a precise alignment with soil physics, root biology, and local climate parameters. Unlike manufactured plastic or aluminum strips, natural stone has weight, porosity, and mineral composition that directly impact the soil microenvironment immediately adjacent to it.
| Parameter | Optimal Condition | Common Mistake | Why It Matters |
|---|---|---|---|
| Burial Depth | 3 to 5 inches (7.6 to 12.7 cm) | Laying stone directly on top of the turf | Unburied stone shifts during freeze-thaw cycles and allows grass runners underneath. |
| Sub-base Material | 2 inches (5 cm) of compacted crushed limestone or gravel | Setting heavy stones directly into loose topsoil | Loose soil settles unevenly, causing stone edging to warp and tilt within 90 days. |
| Soil pH Interaction | Matched to plant requirements (e.g., limestone for alkaline lovers) | Using reactive limestone around acid-loving ericaceous plants | Leaching calcium carbonate alters soil pH, causing iron chlorosis in acid-loving species. |
| Drainage Clearance | 0.5-inch (1.3 cm) gap or weep paths every 6 feet (1.8 m) | Creating an impermeable stone dam on a slope | Traps excess water, drowning root systems and causing turf waterlogging. |
When managing the irrigation of beds bordered by stone, keep in mind that stone edges can alter runoff patterns. If you rely on well water for irrigation—a practice detailed in our guide on using well water in the garden a good idea—be aware that high mineral content in well water can sometimes cause unsightly calcium scaling on dark granites or sandstones over long hot summers with temperatures exceeding 90°F (32°C).
💡 Pro-Tip: Before committing to a specific stone type, always perform a simple vinegar test on your prospective edging material. Drop a few splashes of household white vinegar onto the stone. If it fizzes, it is calcareous (like limestone or marble) and will raise the pH of adjacent soil. If it remains inert, it is siliceous (like granite, slate, or quartzite) and chemically neutral, making it safe for acid-loving plantings like blueberries and rhododendrons.
3. Step-by-Step Cultivation, Feeding & Propagation
Laying natural stone garden edging is a structural craft that requires patience and precision. Follow this exact sequence to ensure your installation lasts for decades without sagging or shifting.
- Map and Trench: Mark your bed layout using a heavy-duty nylon mason’s line and marking paint. Excavate a trench along the line that is 6 inches (15 cm) wide and deep enough to accommodate both your sub-base and one-third of the stone's total height (typically 3 to 5 inches [7.6 to 12.7 cm] of burial depth).
- Compact the Sub-Base: Pour 2 inches (5 cm) of ¾-inch minus crushed angular gravel into the bottom of the trench. Tamp it down firmly using a hand tamper or mechanical plate compactor until it achieves a solid, unyielding density.
- Establish a Level Baseline: Stretch a string level across your trench to maintain a consistent grade. Lay your foundational stones end-to-end, tapping each piece gently with a rubber mallet to seat it firmly into the crushed gravel bed.
- Shim and Lock: Check each stone for wobbles. If a stone rocks, lift it slightly and pack more gravel underneath, or insert flat stone shims beneath the base. Never use organic wood shims, which rot and cause structural failure.
- Backfill and Dress: Backfill the exterior side of the stone trench with native soil, tamping it down to lock the stone vertically. On the interior garden side, backfill with your prepared soil mix, ensuring you leave at least 2 inches (5 cm) of exposed stone face to prevent mulch from spilling over.
Before planting delicate groundcovers or creepers in the cracks between your new stones, take a moment to evaluate your soil's natural acidity; if you are unsure of your baseline levels, consult our quick reference on how to test garden soil ph without a kit before amending your beds. Proper tool maintenance is equally critical during this phase; keeping your spades and trowels razor-sharp using the techniques outlined in how to sharpen garden tools properly at home will save you hours of physical strain when cutting clean trench walls.
⚠️ Important Caution: Never attempt to lift flagstones or large boulders exceeding 50 lbs (22.7 kg) using your lower back. Always lift with your legs bent at a 90-degree angle, keeping the heavy stone mass pressed close to your chest to prevent severe lumbar injury.
4. Common Problems, Pests & Troubleshooting
Even the most meticulously installed natural stone garden edging faces environmental challenges over time. Here is how to diagnose and resolve the most frequent issues:
- Frost Heave and Tilting: During winters where ground temperatures fluctuate wildly around 32°F (0°C), water trapped beneath shallowly buried stones freezes, expands, and pushes stones out of alignment. Remedy: Lift the affected stones, excavate an additional 2 inches (5 cm) of soil, add a deeper coarse gravel drainage layer, and reset the stones.
- Aggressive Grass Infiltration: Rhizomatous grasses like Kentucky bluegrass and Bermuda grass will squeeze through microscopic gaps between dry-stacked stones. Remedy: Install a heavy-duty, root-blocking geo-textile fabric vertically against the back wall of your trench before setting the stones, extending it 6 inches (15 cm) down into the earth.
- Algal and Lichen Overgrowth: Shady, damp northern exposures often cause green algae or crustose lichens to coat porous sandstones. While harmless to the stone structurally, it can become dangerously slick. Remedy: Scrub the stone surface annually in early spring with a stiff-bristled nylon brush and a solution of warm water and mild biodegradable dish soap. Avoid harsh chemical bleach, which leaches into adjacent garden beds and harms beneficial soil microbiology.
- Ant Colonies and Burrowing Pests: Voids beneath loose natural stone provide ideal nesting sites for pavement ants and voles. Remedy: Ensure zero air pockets exist beneath your stones by thoroughly wet-packing your crushed gravel sub-base during installation.

5. Frequently Asked Questions
What is the best thickness for natural stone garden edging?
For stability and durability, natural stone edging pieces should be a minimum of 2 inches (5 cm) to 4 inches (10 cm) thick. Thinner stones (under 1.5 inches [3.8 cm]) snap too easily under accidental lawnmower impacts or heavy seasonal frost expansion.
Do I need to use mortar between natural stone garden edging?
No, mortar is rarely necessary for standard garden edging and is generally discouraged. Dry-stacked stones allow for natural soil shifting and seasonal expansion without cracking, while also permitting optimal lateral drainage through the joints.
How do I stop grass from growing over my stone edge?
The most effective long-term prevention is cutting a 90-degree "V-groove" trench (often called a bed shaper trench) directly on the lawn side of your stone edge, maintaining a clean 2-inch (5 cm) drop-off that stops grass runners from bridging the gap.
Can I use irregular fieldstones instead of cut blocks?
Absolutely. Irregular fieldstones create a stunning, organic cottage-garden aesthetic. The key is spending extra time during the installation phase to select stones with at least one relatively flat bottom face so they sit stably in your gravel trench without rocking.
Related Guides
📋 Table of Contents ▼ Click to expand
Tags:
🌿 Related Plants You Might Like






PlantSavvyWorld
Editorial team
PlantSavvyWorld is an independent botanical education project. Articles are drafted with AI assistance, then edited and checked against university extension services, botanical garden collections and other published horticultural sources.