

Total Guide to Moringa Why You Should Grow the Miracle Tree or Drumstick Vegetable
Written with AI assistance, edited and checked against horticultural sources.

1. Botanical Overview & Natural Habitat
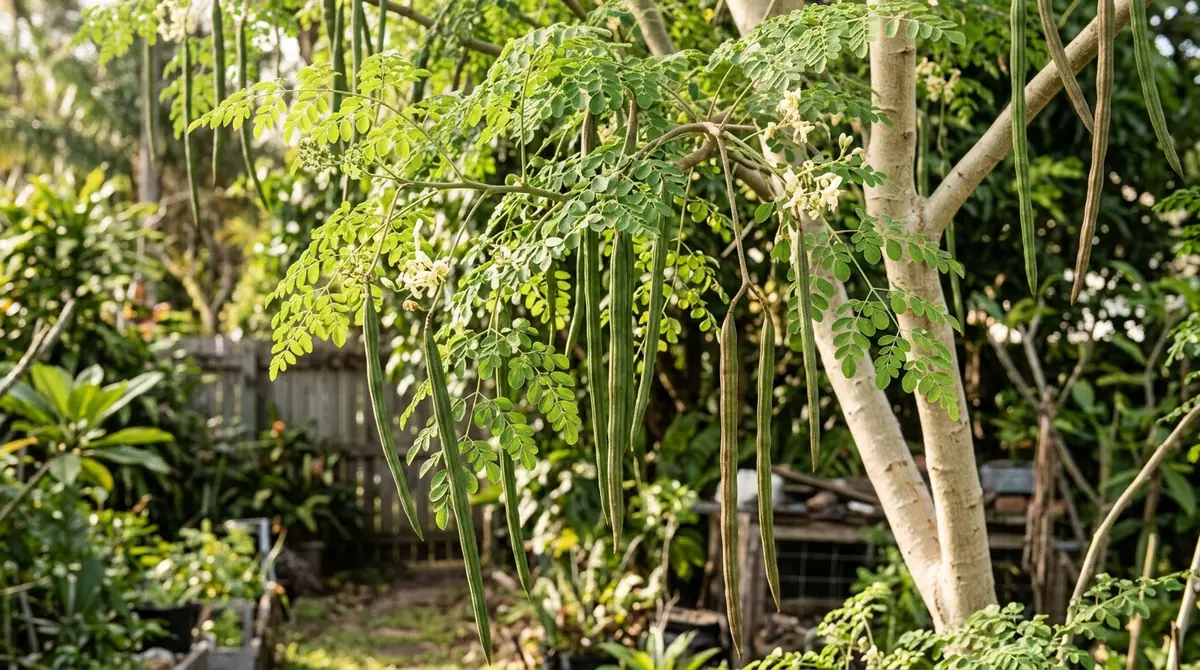
Moringa oleifera belongs to the monogeneric family Moringaceae, containing roughly 13 distinct species of deciduous trees and shrubs. Native to the southern foothills of the Himalayas in northwestern India, Moringa oleifera has adapted to endure extreme environmental stress. It is a fast-growing, soft-wooded tree that can easily reach heights of 30 to 40 feet (9 to 12 meters) in its native habitat if left unpruned. However, in modern edible landscapes, we treat it more like an herbaceous perennial or intensive annual crop, keeping it aggressively coppiced at 6 to 8 feet (1.8 to 2.4 meters) for easy leaf harvesting.
The plant's leaves are tripinnate—delicate, feathery, and compound, composed of numerous small, oval leaflets that fold inward during periods of severe drought or frost. The flowers are fragrant, bisexual, creamy-white, and measure about 1 inch (2.5 cm) across, borne in drooping axillary panicles that attract a flurry of native bees and beneficial pollinators.
Following pollination, the tree produces elongated, ribbed, triangular seed pods—affectionately known as "drumsticks"—that can stretch up to 18 inches (45.7 cm) in length. Inside these woody capsules lie dark brown, winged seeds that are naturally buoyant and packed with natural flocculants used historically for water purification.
When designing culinary or companion-planting zones around your property, keep in mind that moringa’s open, airy canopy casts dappled shade, making it an exceptional upper-story companion for shade-tolerant crops or a dynamic accumulator that fixes no nitrogen itself, but mines deep minerals with a massive, tuberous taproot. If you are branching out into other demanding crops, you might find structural design parallels in our guide on How to Grow Butternut Squash in Small Spaces: Vertical Trellising Secrets.
2. Essential Environmental & Care Requirements
Moringa is famously forgiving of poor soil and neglect, but it has strict boundaries when it comes to moisture and temperature. Understanding its wild evolutionary pressures is the key to keeping it thriving in your landscape.
| Parameter | Optimal Condition | Common Mistake | Why It Matters |
|---|---|---|---|
| Temperature | 70°F to 95°F (21.1°C to 35°C) | Exposing to sustained frost below 32°F (0°C) | Freezing temperatures rupture cellular walls in the succulent trunk, causing fatal rot. |
| Soil Drainage | Highly porous, sandy loam (pH 6.5 to 7.5) | Planting in dense, water-logged clay | Standing water suffocates the taproot within 48 hours, inviting Pythium and root rot. |
| Sunlight | Full sun (8 to 12 hours daily) | Shading under heavy tree canopies | Low light causes weak, spindly stems and drastically drops leaf biomass production. |
| Watering | Deep, infrequent irrigation after soil dry-out | Daily shallow sprinkling | Shallow water encourages surface rooting, making the tree unstable and drought-vulnerable. |
To dive deeper into regional performance data, consult the University of Florida IFAS Extension publications on tropical and subtropical food crops.
💡 Pro-Tip: If you live in USDA Hardiness Zones 8 or below, do not treat moringa as a permanent shade tree. Treat it like a tender perennial vegetable. Plant seeds in spring, harvest heavily through autumn, and allow winter freezes to cut it to the ground, or dig it up and pot it for a sunny indoor greenhouse spot.
3. Step-by-Step Cultivation, Feeding & Propagation
Establishing moringa successfully relies on preventing root disturbance and ensuring absolute drainage during the first critical months of establishment. Whether starting from seed or hardwood cuttings, follow this rigorous protocol for maximum yields.
- Site Selection and Soil Preparation: Choose a location receiving unobstructed sun. Dig a planting hole 18 inches (45.7 cm) deep and 12 inches (30.5 cm) wide. Amend heavy native soils with a 50/50 mix of coarse horticultural sand and compost to guarantee rapid drainage.
- Seed Germination (Alternative A): Soak viable moringa seeds in tepid water for 24 hours to soften the seed coat. Plant seeds 1 inch (2.5 cm) deep in seed-starting trays filled with a sterile, well-draining vermiculite and perlite blend. Germination typically occurs within 7 to 14 days at soil temperatures of 75°F to 85°F (23.9°C to 29.4°C).
- Hardwood Cuttings (Alternative B): Select healthy, disease-free branches from a mature tree measuring 1 inch (2.5 cm) in diameter and 3 feet (0.9 meters) in length. Allow the cut ends to callus over in a dry, shaded area for 48 hours to prevent fungal entry. Plant the cutting vertically 1 foot (30.5 cm) deep in sandy soil.
- Initial Irrigation: Water the newly planted seed or cutting thoroughly to settle the soil around the roots. Withhold subsequent heavy watering for 7 to 10 days to force the plant to drive its taproot downward in search of moisture.
- Establishment Feeding: Once new growth reaches 12 inches (30.5 cm) in height, apply a balanced, slow-release organic granular fertilizer (such as a 4-4-4 blend) at a rate of 1 tablespoon per square foot, scratched lightly into the soil surface.
- Coppicing for Bushiness: When the main vertical trunk hits 4 feet (1.2 meters) tall, prune the top third off. This forces lateral bud break, transforming a single-stemmed stick into a dense, multi-branched bush packed with harvestable leaflets.
When setting up your broader vegetable growing layout, balanced soil fertility is just as critical for heavy root vegetables and vine crops. For complementary design strategies, look at our intensive tutorial on How to Grow Huge Tomato Plants: Pruning, Trenching & Heavy Yields.
4. Common Problems, Pests & Troubleshooting
Even the toughest miracle tree encounters obstacles when local environmental parameters drift out of balance. Because moringa stores moisture in its soft, spongy trunk, the vast majority of issues stem from excess humidity or water retention.
⚠️ Important Caution: Never apply synthetic copper-based fungicides or heavy dormant oils to drought-stressed moringa trees without spot-testing a single lower leaf first. Their sensitive, rapidly expanding foliage is prone to chemical burn under high-heat conditions exceeding 90°F (32.2°C).
Root Rot and Stem Canker (Fusarium and Pythium)
- Symptoms: Lower leaves turn yellow and drop prematurely; the base of the trunk turns soft, spongy, and dark brown.
- Cause: Overwatering or poorly draining soil that stays saturated for more than 48 hours.
- Solution: Immediately withhold all irrigation. Excavate around the root crown to expose it to ambient air and speed up drying. If the core taproot is blackened and mushy, the plant cannot be saved; take healthy upper branch tip cuttings and start over in fresh, sandy media.
Aphids and Whiteflies
- Symptoms: Curling, distorted terminal leaves coated in sticky honeydew, frequently accompanied by black sooty mold.
- Cause: Nutrient imbalances (specifically excess nitrogen) combined with warm, still air lacking predatory insect diversity.
- Solution: Blast infested branch tips with a strong, high-pressure stream of water from a garden hose early in the morning. Follow up by spraying horticultural soap or neem oil directly onto the undersides of leaves, ensuring complete contact with the soft-bodied pests.
Nutrient Deficiencies (Chlorosis)
- Symptoms: Interveinal yellowing on younger leaves while the leaf veins remain green, or stunted, purplish-tinged older foliage.
- Cause: Alkaline soils locking up iron, or a lack of secondary micronutrients like magnesium and sulfur.
- Solution: Apply a chelated iron foliar spray for an immediate green-up, and top-dress the root zone with elemental sulfur or rich, acidic leaf mold to slowly adjust soil pH downward toward the optimal 6.5 range.
5. Frequently Asked Questions
Can you grow moringa in a container indoors?
Yes, you can easily grow moringa indoors by planting seeds in a 5-gallon (19-liter) or larger fabric container filled with a fast-draining cactus and succulent potting mix. Place the container in your home's sunniest south-facing window, ensuring it receives at least 6 to 8 hours of direct light daily. Pinch the growing tips regularly to keep the plant compact, and scale back watering significantly during the winter months when indoor light intensity drops.
How often should you harvest moringa leaves for maximum yield?
To maximize leaf production without exhausting the plant, wait until your moringa tree reaches at least 5 feet (1.5 meters) in height. Begin harvesting by shearing off the tender young branch tips, taking the top 12 to 18 inches (30.5 to 45.7 cm) of growth. This harvesting method acts as a natural pruning event, stimulating the tree to push out multiple new lateral branches within 14 to 21 days during the peak growing season.
Why are the leaves on my moringa tree turning yellow and falling off?
Yellowing and leaf drop are classic warning signs of root stress, most commonly caused by overwatering or soil compaction. Moringa handles underwatering far better than overwatering. Check your soil moisture 2 inches (5 cm) deep; if it feels damp or muddy, cease watering entirely until the media dries out completely. Poor drainage or a sudden drop in ambient temperatures below 50°F (10°C) can also trigger this protective shedding response.
What does the drumstick vegetable taste like, and how do you cook it?
The immature green seed pods—the "drumsticks"—feature a flavor profile strikingly similar to a cross between tender asparagus and green beans, with a subtle nutty undertone. To prepare them, snap the pods into 3-inch (7.6-cm) segments, peel away any tough outer fibrous strings if necessary, and boil, steam, or toss them into rich curries, soups, and stews. Instead of eating the whole pod, diners typically scrape out the soft, flavorful flesh and seeds with their teeth, discarding the fibrous outer husk.
Related Guides
- How to Make Organic Compost for Vegetable Gardens at Home
- How to Get Rid of Aphids in Vegetable Garden Naturally
- How to Attract Beneficial Insects to your Vegetable Garden
- Complete Guide to Winter Vegetable Harvesting for Beginners
- Best Vegetable Gardening Books for Beginners
- Best Soil Thermometer for a Head Start in your Vegetable Garden
📋 Table of Contents ▼ Click to expand
Tags:
Keep reading
🌿 Related Plants You Might Like






PlantSavvyWorld
Editorial team
PlantSavvyWorld is an independent botanical education project. Articles are drafted with AI assistance, then edited and checked against university extension services, botanical garden collections and other published horticultural sources.