

Insulating Greenhouse
Written with AI assistance, edited and checked against horticultural sources.
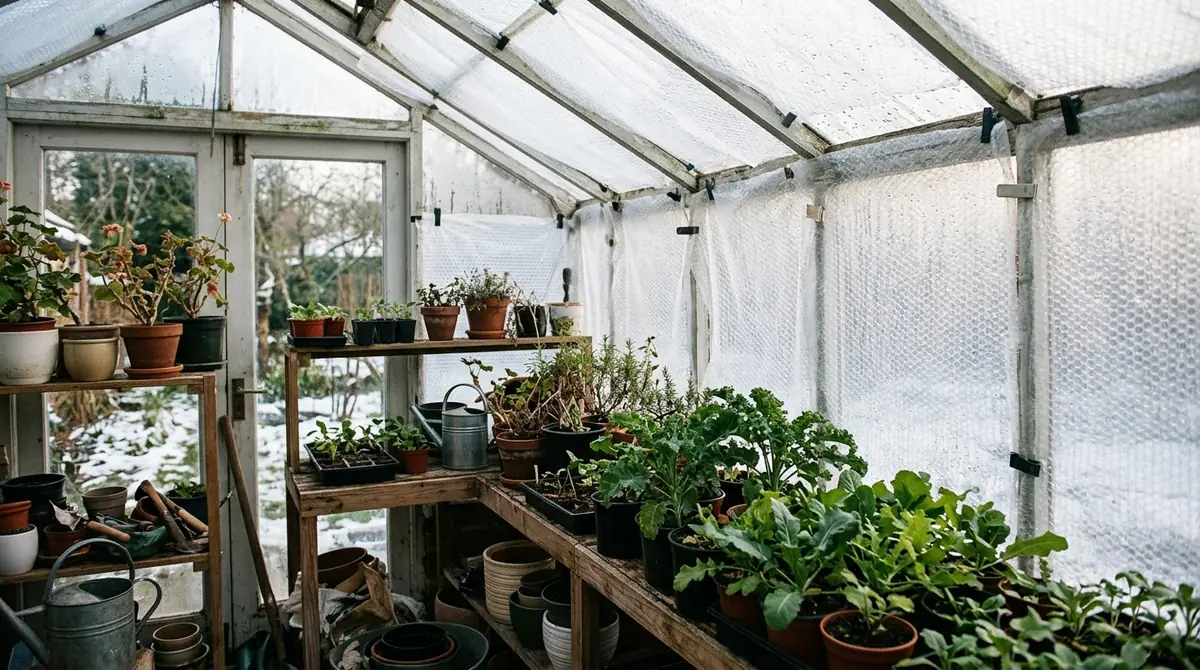
When external temperatures drop to 32°F (0°C) with frost, tender plants like the Madagascar periwinkle (Catharanthus roseus) require sixty-degree ambient warmth to keep their glossy leaves completely free of cold stress. That climate barrier is the result of a deliberate, multi-layered insulating strategy. An uninsulated greenhouse acts as a giant heat sieve, but understanding how thermal energy escapes structured glass and polycarbonate allows a frosty space to transform into a thriving, Mediterranean-grade sanctuary.
1. Botanical Overview & Natural Habitat

When we transplant these flora into temperate regions and house them in glass or single-wall plastic structures, we subject them to radical thermal shocks. Without proper thermal mass and insulation, a greenhouse experiences drastic heat loss the moment the sun sets. Radiative heat escapes directly through the roof and walls, plunging the internal microclimate down to outdoor ambient levels within hours. This sudden drop disrupts cellular turgor pressure, halts enzymatic functions, and halts nutrient uptake.
Insulating your greenhouse essentially creates an artificial micro-ecosystem that mimics the stable thermal buffers found in nature, such as dense rainforest canopies or deep soil layers. By slowing down heat transfer, you protect cellular membranes from ice crystal formation and prevent root systems from experiencing metabolic shut-down. Whether you are prepping your space for winter or timing when to start seeds in greenhouse environments early in the spring, maintaining predictable thermal baselines is the foundation of all successful greenhouse botany.
💡 Join the Discussion: Need custom advice on heating calculations, polycarbonate selection, or winter airflow? Join fellow growers in our active Greenhouse Gardening Community Forum to ask questions and share your greenhouse build.
2. Essential Environmental & Care Requirements
Insulation is not merely about trapping heat; it is about balancing thermal retention with the physiological needs of living plants. When you seal a greenhouse tightly, you alter vapor pressure deficits, light transmission, and gas exchange.
Light transmission is your primary trade-off. Every layer of insulation you add—whether it is bubble wrap, twin-wall polycarbonate, or thermal fleece—reduces the Photosynthetically Active Radiation (PAR) reaching your canopy. Therefore, your insulation materials must prioritize high light transmittance, typically aiming for at least 80% light penetration during daylight hours.
Humidity management is equally vital. Trapped heat paired with high soil moisture creates an ideal breeding ground for fungal pathogens like Botrytis cinerea (gray mold) and powdery mildew. Your insulation strategy must be paired with active air circulation, ensuring that relative humidity stays within the optimal 50% to 70% range for most greenhouse crops.
| Parameter | Optimal Condition | Common Mistake | Why It Matters |
|---|---|---|---|
| Minimum Night Temperature | 50°F to 55°F (10°C to 13°C) for tropicals | Allowing temperatures to dip below 40°F (4°C) | Prevents irreversible cellular damage and root chilling |
| Light Transmission | >80% PAR penetration | Using opaque, heavy-grade foam on walls | Starves plants of necessary energy for photosynthesis |
| Relative Humidity | 50% to 70% | Sealing the structure completely without ventilation | Invites devastating fungal outbreaks and root rot |
| Thermal Resistance (R-Value) | R-2.5 to R-3.5 for year-round growing | Relying on uninsulated single-pane glass | Results in unsustainable heating bills and extreme frost risk |
💡 Pro-Tip: When installing bubble wrap insulation on glass, look for the large-bubble agricultural grade (typically 1/2-inch to 3/4-inch cells). The large air pockets provide superior thermal resistance compared to small packing bubbles, while allowing significantly more natural light to diffuse evenly across your plant canopy.
3. Step-by-Step Cultivation, Feeding & Propagation
Applying insulation correctly requires a systematic approach that seals gaps without suffocating your botanical collection. Follow this step-by-step protocol to winterize or insulate your growing space effectively.
- Conduct a Thermal Audit: On a chilly morning when outdoor temperatures are at least 20°F (-6°C) colder than inside, use an infrared thermometer or your bare hand to locate drafts. Check glazing joints, door frames, foundation seals, and exhaust fan shutters.
- Seal Air Leaks and Structural Gaps: Caulk permanent gaps with exterior-grade silicone sealant. Install heavy-duty brush sweeps along the bottom of doors and rubber gaskets around window frames to eliminate cold drafts that can instantly kill tender seedlings.
- Apply Double-Layer Glazing or Bubble Wrap: If working with single-pane glass or thin fiberglass, line the interior framing with UV-stabilized polyethylene bubble wrap. Secure the material using specialized greenhouse clips, snap-in PVC channels, or double-sided tape, leaving a 1-inch dead-air space between the bubble wrap and the glass.
- Establish Thermal Mass Anchors: Place heavy 55-gallon (208-liter) dark-colored water barrels or masonry blocks along the northern wall of the greenhouse. These structures absorb solar radiation by day and slowly release thermal energy back into the space during the night, smoothing out temperature curves.
- Install Automated Circulation and Heating: Position low-wattage, oscillating circulation fans near the floor and ceiling to prevent thermal stratification (where hot air pools at the roof while freezing air settles on the plants). Pair these with a reliable, thermostat-controlled heater calibrated to kick on precisely when temperatures drop below your target minimum.
⚠️ Important Caution: Never use unvented kerosene or propane heaters inside a sealed, insulated greenhouse. As these fossil fuels burn, they release ethylene gas, carbon monoxide, and excess moisture, which can rapidly cause bud blast, leaf drop, and total crop asphyxiation. Always use electric heaters or properly vented gas systems. For further technical guidance on structural climate control, consult the University of Florida IFAS Extension resources on protected agriculture.
4. Common Problems, Pests & Troubleshooting
When you insulate a greenhouse, you fundamentally alter its internal climate, which can inadvertently roll out the welcome mat for specific physiological disorders and pest pressures.
Condensation is enemy number one in a heavily insulated structure. When warm, moisture-laden air hits a chilled surface (even an insulated one), it condenses into water droplets. If this water drips continuously onto plant crowns, it invites stem rot. Combat this by running horizontal airflow fans 24/7 and watering your plants early in the morning rather than at dusk, allowing excess surface moisture to evaporate before nightfall.
Pests such as fungus gnats (Bradysia species) and spider mites (Tetranychus urticae) thrive in the still, warm air characteristic of tight greenhouses. Inspect the undersides of leaves weekly using a 10x hand lens. If pest populations surge, introduce biological controls like Hypoaspis miles soil-dwelling predatory mites for fungus gnats, or release Phytoseiulus persimilis for spider mite management before resorting to horticultural oils. For comprehensive plant pathology references, review the diagnostic tools provided by the Royal Horticultural Society.

5. Frequently Asked Questions
Can I use standard bubble wrap from the post office to insulate a greenhouse?
No. Standard shipping bubble wrap lacks UV inhibitors and will rapidly degrade, yellow, and flake apart under direct sunlight within a single growing season. Always purchase UV-stabilized greenhouse bubble insulation, which is engineered to last for several years while maintaining high light transmission.
How much money will insulating a greenhouse actually save on heating costs?
Adding an effective layer of insulation—such as twin-wall polycarbonate or double-layer bubble wrap coupled with sealed perimeter gaps—can reduce heating energy consumption by 30% to 50%. The exact savings depend on your climate zone, but the insulation materials typically pay for themselves in reduced fuel or electric bills within a single winter.
How do I prevent condensation from dripping onto my plants?
Condensation is managed through a combination of thermal insulation, adequate heating, and constant air movement. Ensure your bubble wrap is pulled taut so water droplets slide down the sides to the baseboards rather than dripping straight down. Additionally, run small oscillating fans to keep the air mixed and prevent stagnant humidity pockets from forming.
Will insulating a greenhouse reduce the amount of light my plants get?
Any physical barrier placed between your plants and the sun will absorb or reflect a small percentage of light. High-quality greenhouse bubble insulation typically blocks less than 10% of incoming light. To minimize light loss, keep the interior surfaces clean, wash dust off the exterior glass or plastic panels annually, and remove temporary insulation layers as soon as the danger of spring frost has passed.
Related Guides
- Floor Greenhouse
- How to Heat Greenhouse in Winter
- Glass for Greenhouse
- When to Start Seeds in Greenhouse
📋 Table of Contents ▼ Click to expand
Tags:
Keep reading
🌿 Related Plants You Might Like






PlantSavvyWorld
Editorial team
PlantSavvyWorld is an independent botanical education project. Articles are drafted with AI assistance, then edited and checked against university extension services, botanical garden collections and other published horticultural sources.