

Iris Identifier
Written with AI assistance, edited and checked against horticultural sources.
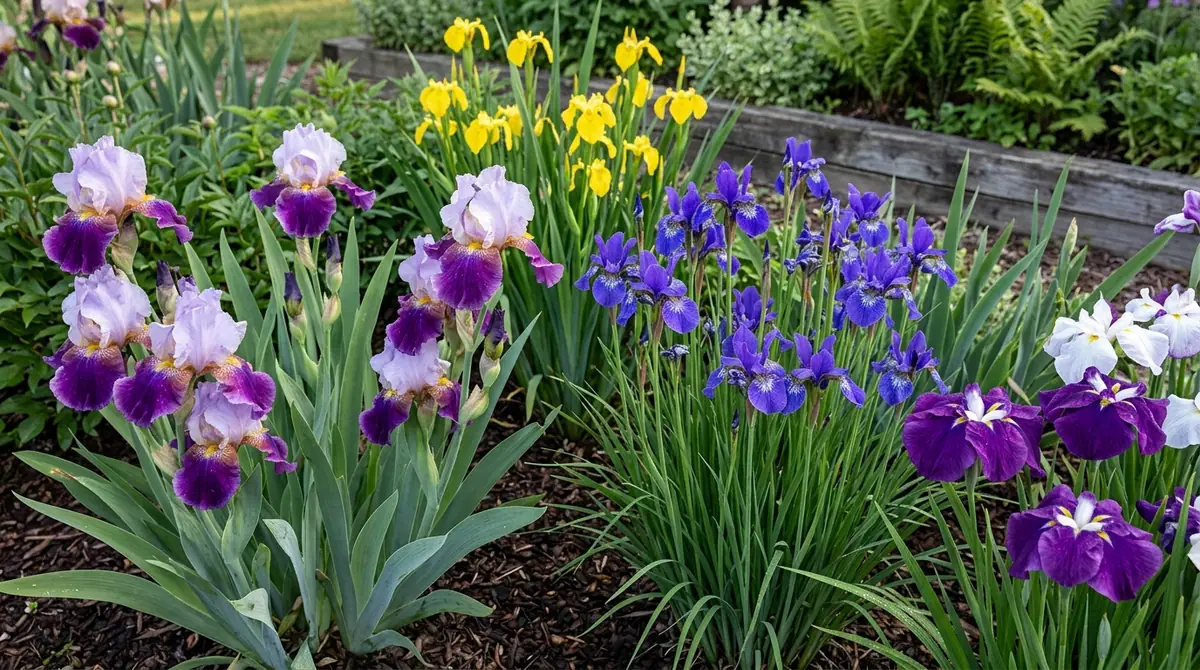
I was knee-deep in loam behind the conservatory on a brisk Tuesday morning in April when a gardener handed me a bedraggled rhizome, asking if it was a weed or a prize-winning perennial. The fan of flattened leaves and the distinct, torpedo-shaped storage root gave it away instantly: it was an Iris, recovering from being planted upside down at a suffocating 4 inches (10 cm) deep. That moment of rescue inspired this guide. If you have ever stared at a sword-shaped leaf blade and wondered exactly which iris variety is gracing your garden, you need a reliable iris identifier. Let us dive into the wonderful, complex world of the Iris genus and learn how to identify, grow, and troubleshoot these architectural beauties.
1. Botanical Overview & Natural Habitat

To accurately use an iris identifier in your landscape, you must understand their primary structural divisions: bearded, beardless, and bulbous.
Bearded irises (Iris germanica and its hybrids) are the royalty of the dry garden. They feature distinct, fuzzy "beards" running down the center of the lower petals (falls), which act as a landing pad for pollinators. They originate primarily from the dry, limestone-rich soils of the Mediterranean and Middle East. Their leaves are rigid, sword-shaped, and arranged in flat, fan-like tiers. They store energy in horizontal, fleshy rhizomes that must sit partially exposed to the sun.
Beardless irises include stunning groups such as Siberian (Iris sibirica), Japanese (Iris ensata), and Louisiana irises. These lack the fuzzy caterpillar-like beard. Instead, their falls often feature delicate signal patterns of yellow or white veins designed to guide bees. Siberian irises prefer neutral to slightly acidic, moist loams, while Japanese irises demand consistently wet, acidic soils and can tolerate standing water during the growing season. Their root systems are more fibrous and clumping than the bulky rhizomes of bearded types.
Bulbous irises—such as Dutch irises (Iris × hollandica)—do not use rhizomes or fibrous clumps at all. Instead, they grow from true underground storage bulbs. They feature narrower, rush-like foliage and slender stems carrying remarkably silky, orchid-like blooms. They thrive in well-drained, sandy soils and die back completely to the bulb during their summer dormancy.
Across all species, the flower architecture remains remarkably consistent: three upright petals called "standards" and three drooping or spreading outer petals called "falls." Understanding this unique geometry is your most powerful tool when trying to key out an unknown specimen in the wild or in a neglected garden bed.
2. | Essential Environmental & Care Requirements
Growing irises successfully requires matching their wild origins to your specific microclimate. Because the genus is so diverse, a blanket care routine will lead to failure.
Bearded irises require baking sun. They need a minimum of 6 to 8 hours of direct sunlight daily. Planting them in shade halts flower production and invites fungal rot. Soil drainage is non-negotiable; they rot rapidly if left in stagnant moisture. Amend heavy clay soils with coarse sand and compost to build a raised bed or slope that sheds water effectively.
Siberian and Japanese irises require a different approach. While they appreciate full sun, they tolerate light afternoon shade in hot southern zones. They demand moisture retention. Organic matter such as well-rotted leaf mold or peat-free compost should be worked into the top 6 to 8 inches (15 to 20 cm) of soil to retain moisture without souring it.
💡 Pro-Tip: When planting bearded irises, ensure the top third of the rhizome remains exposed to the sun and air. Burying a bearded iris rhizome too deeply is the single most common reason plants produce lush foliage but zero flowers.
| Parameter | Optimal Condition | Common Mistake | Why It Matters |
|---|---|---|---|
| Sunlight | Full sun (6–8+ hours daily) | Planting in partial shade | Shade reduces blooming and increases susceptibility to soft rot. |
| Soil pH | 6.8 to 7.0 for bearded; 5.5 to 6.5 for Japanese | Ignoring soil chemistry | Incorrect pH locks out essential micronutrients, causing chlorosis. |
| Planting Depth | Rhizome exposed (Bearded); 2–3 inches (5–7.5 cm) deep (Siberian) | Burying bearded rhizomes deep | Deep burial traps moisture around the crown, triggering bacterial rot. |
| Watering | 1 inch (2.5 cm) per week during active growth; dry dormancy | Overwatering dormant bearded irises | Excess summer moisture causes rhizome decay during dormancy. |
For deep-dive botanical research on specific regional adaptations, consult the resources provided by the Royal Horticultural Society for international cultivar data and the University of Minnesota Extension for localized perennial management strategies.
3. | Step-by-Step Cultivation, Feeding & Propagation
Propagating and maintaining irises keeps clumps vigorous and guarantees an abundance of blooms year after year. For bearded irises, the ideal time to divide and transplant is mid-summer (July to August), roughly 4 to 6 weeks after bloom season finishes.
Follow this step-by-step protocol to successfully divide and propagate your rhizomatous irises:
- Sanitize Your Tools: Sterilize your garden spade, knife, and pruning shears using a 10% bleach solution or rubbing alcohol to prevent transferring bacterial pathogens between plants.
- Lift the Clump: Insert your garden fork or spade approximately 8 to 10 inches (20 to 25 cm) away from the outer edge of the iris fan. Pry the entire root mass upward to extract it from the soil with minimal damage.
- Wash and Inspect: Gently hose away clinging soil from the rhizomes. Inspect the cluster for soft, mushy spots, tunneling pests, or hollow interior tissue. Discard any diseased material immediately.
- Divide the Rhizomes: Using your sharp knife, cut the healthy young forward-growing sections (divisions) away from the old, woody mother rhizome. Each viable division must feature at least one sturdy fan of healthy green leaves.
- Trim Foliage: Cut back the remaining leaves into an inverted 'V' shape, leaving them about 6 to 8 inches (15 to 20 cm) long. This reduces wind resistance and moisture loss while the new root system establishes.
- Heal the Cuts: Allow the newly cut rhizome surfaces to callous over in a shaded, well-ventilated spot for 24 to 48 hours before replanting.
- Replant at Proper Depth: Dig a shallow trench 2 to 3 inches (5 to 7.5 cm) deep. Create a small mound of soil in the center of the hole, set the rhizome on top with the roots spread outward down the sides, and backfill, leaving the top of the rhizome exposed to the sun.
- Initial Watering: Water the newly planted divisions thoroughly to settle the soil around the roots. Withhold heavy watering for the next 10 to 14 days to encourage deep root-seeking behavior.
Fertilization should be handled with care. Apply a low-nitrogen, high-phosphorus fertilizer (such as a 5-10-10 or 6-12-12 blend) in early spring as new growth emerges. Avoid high-nitrogen fertilizers at all costs; they force rapid, succulent leaf growth that acts as a beacon for insect pests and leaves the plant structurally weak against wind damage.
4. | Common Problems, Pests & Troubleshooting
Even with careful cultivation, your irises may occasionally encounter physiological stress or pest pressure. Identifying symptoms early saves your display.
⚠️ Important Caution: Never compost iris foliage or rhizomes showing signs of bacterial soft rot or iris borer damage. Dispose of infected plant material in the municipal trash or burn it to prevent spores and larvae from overwintering in your garden soil.
The most destructive pest is the Iris Borer (Macronoctua onusta). Adult moths lay eggs on old iris leaves in autumn. In spring, the hatching larvae tunnel down the interior of the emerging leaves, chewing their way into the rhizome. You will notice water-soaked streaks on the leaves and ragged edges. If left unchecked, the larvae hollow out the rhizome completely, allowing secondary bacterial infections to take over. Control this by clearing all garden debris in late autumn and treating plants with an organic spinosad or beneficial nematodes in early spring when larvae are actively migrating.
Soft Rot (Pectobacterium carotovorum) is a bacterial disease that turns rhizomes into a foul-smelling, mushy paste. It enters through wounds inflicted by borers, frost damage, or careless weeding. To treat soft rot, carve away the infected tissue with a sterilized knife until you reach clean, white, firm flesh. Dust the wound liberally with agricultural sulfur powder or cinnamon and leave it exposed to the sun to dry out.
Leaf Spot (Didymina iridis) appears as small, water-soaked brown spots on the leaves in spring, which later develop grayish centers with reddish-brown margins. While rarely fatal, it ruins the architectural look of the foliage. Prune and destroy severely infected leaves in autumn, and ensure adequate plant spacing to maximize air circulation.
5. | Frequently Asked Questions
Why are my iris leaves turning yellow and dying back?
Leaf yellowing in irises typically points to one of three issues: overwatering causing root or rhizome rot, iron chlorosis due to alkaline soil locking out nutrients, or an active iris borer infestation inside the foliage. Check the base of the plant; if the rhizome is firm and free of tunneling, adjust your watering schedule or amend the soil to adjust the pH.
How do I know if my iris is a bearded or beardless variety?
Examine the center of the lower three petals (the falls). If you see a distinct, fuzzy, caterpillar-like line of hairs running down the center, it is a bearded iris. If the petal surface is entirely smooth, featuring only veins or a contrasting colored signal patch without hairs, it is a beardless variety such as a Siberian or Japanese iris.
When is the best time to transplant established iris clumps?
The ideal window for dividing and transplanting bearded irises is 4 to 6 weeks after they finish blooming, which usually falls between July and August in most temperate zones. This timing allows the newly divided rhizomes to establish strong roots before winter dormancy while avoiding the stress of active spring growth.
Do iris bulbs need to be dug up for winter?
It depends entirely on the type. Bearded and standard perennial irises (Siberian, Japanese) are exceptionally hardy and can remain in the ground year-round across USDA Zones 3 through 9. However, tender bulbous irises—such as Spanish or English irises grown in cold climates with freezing, wet winters—often benefit from being dug up after foliage dies back and stored in a cool, dry place until spring planting.
📋 Table of Contents ▼ Click to expand
Related Guides
Tags:
Keep reading
🌿 Related Plants You Might Like






PlantSavvyWorld
Editorial team
PlantSavvyWorld is an independent botanical education project. Articles are drafted with AI assistance, then edited and checked against university extension services, botanical garden collections and other published horticultural sources.