

How to Setup a Drip Irrigation System for Raised Beds
Written with AI assistance, edited and checked against horticultural sources.
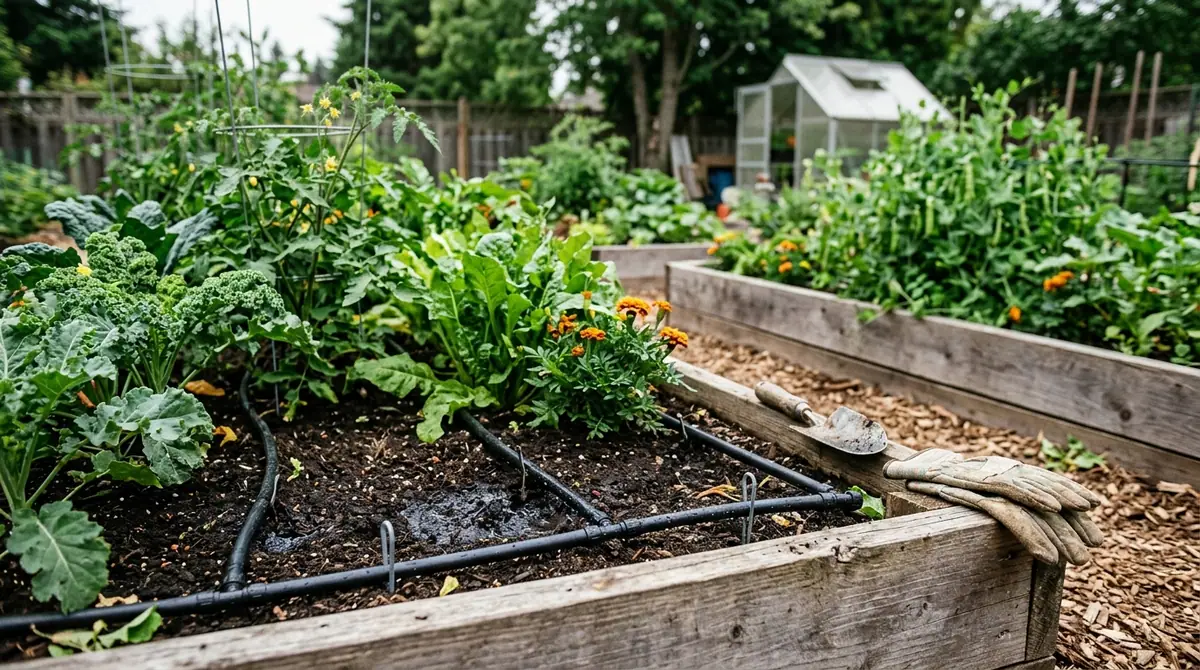
When mid-summer heat hits an unforgiving 98°F (36.6°C) for six consecutive days, heirloom 'Brandywine' tomatoes can go completely limp, with lower leaves curling inward to protect against severe transpirational stress. Hand-watering with a long hose and a breaker nozzle often fails because water beads off the dry, hydrophobic surface of raised bed soil mixes, instantly evaporating or running off the sides instead of saturating the root zone 6 to 8 inches (15 to 20 cm) down.

1. Botanical Overview & Natural Habitat
To understand why drip irrigation is so critical for raised beds, we must first look at the rhizosphere—the narrow zone of soil directly influenced by root secretions and associated soil microorganisms. In a natural ecosystem, plant roots stretch deep into the soil profile, seeking out a stable subterranean moisture gradient. Raised beds, however, are artificial, contained ecosystems typically elevated 12 to 36 inches (30 to 90 cm) above the surrounding grade.
When you water overhead with a garden sprinkler or a hand wand, you mimic a violent, heavy downstorm that compacts the top 1 inch (2.5 cm) of soil, forms a crust, and encourages shallow root growth. In nature, plants experience gentle, sustained moisture infiltration. A drip irrigation system replicates this natural hydrology by delivering water directly to the soil surface or subsurface at a slow, measured rate—typically 0.5 to 2 gallons (1.9 to 7.6 liters) per hour per emitter.
By targeting water delivery exclusively to the base of the plants, you keep the foliage entirely dry. This is a vital botanical consideration: fungal pathogens such as Botrytis cinerea (gray mold) and Alternaria solani (early blight) require free-standing water on leaf surfaces for spore germination and tissue penetration. Drip irrigation eliminates this vector entirely. Furthermore, because raised beds are often filled with high-organic-matter soil blends rich in compost and peat, overhead watering washes away vital micronutrients and leads to rapid soil erosion. Drip lines preserve the crumb structure of your soil aggregates, maintaining optimal soil aeration (macropores) and water retention (micropores) which are essential for root respiration and nutrient uptake by actinomycetes and mycorrhizal fungi.
2. Essential Environmental & Care Requirements
Designing a drip system requires calculating your water budget based on plant physiology, evaporation rates, and soil composition. Most vegetable crops grown in raised beds require approximately 1 to 1.5 inches (2.5 to 3.8 cm) of water per week during the peak growing season (temperatures consistently above 85°F / 29.4°C).
| Parameter | Optimal Condition | Common Mistake | Why It Matters |
|---|---|---|---|
| Operating Pressure | 25 to 30 PSI (1.7 to 2.1 bar) | Attaching lines directly to a high-pressure spigot (50+ PSI) | Over-pressurization blows emitters off tubing and ruptures fittings. |
| Emitter Flow Rate | 0.5 to 1.0 GPH (1.9 to 3.8 LPH) | Using high-flow emitters (2+ GPH) in sandy-loam raised bed mixes | High flow rates cause water to channel and pool rather than spread laterally. |
| Filtration | 150-mesh / 100-micron screen filter | Skipping the filter to save time | Tiny particles of sand or rust will clog micro-emitters within weeks. |
| Line Depth (Subsurface) | 2 to 4 inches (5 to 10 cm) deep | Exposing surface drip tape to direct UV rays and foot traffic | UV degradation breaks down polyethylene, and foot traffic crushes lines. |
💡 Pro-Tip: Always install a pressure regulator immediately after your hose bib or backflow preventer. Municipal water pressure often fluctuates between 50 and 80 PSI, which is far too high for standard 1/4-inch micro-tubing and emitter buttons. Dropping the pressure to a steady 25 PSI ensures uniform distribution across every raised bed in your system.
3. Step-by-Step Cultivation, Feeding & Propagation
Setting up your drip system requires patience and precise layout planning. Follow this step-by-step protocol to install a professional-grade system in a standard 4x8 foot raised bed setup.
- Map Your Garden and Layout: Sketch your raised beds, noting the distance from your outdoor faucet. Measure the linear footage needed for main supply lines (typically 1/2-inch polyethylene tubing) and secondary drip lines (1/4-inch tubing or pre-installed emitter line).
- Install Head Assembly Components: At your outdoor spigot, screw on a mechanical hose-end timer, followed by a backflow preventer (vacuum breaker), a 25 PSI pressure regulator, and a 150-mesh screen filter. Never omit the filter; it is the frontline defense for your emitters.
- Run the Main Supply Line: Lay out your 1/2-inch poly tubing from the spigot to your raised beds. Secure the tubing along the ground or bury it shallowly under mulch to protect it from lawnmowers and direct sunlight. Climb the side of the raised bed using secure mounting staples designed for poly tubing.
- Punch Holes and Attach Micro-Tubing: Using a professional hole-punch tool, puncture the 1/2-inch main line wherever a raised bed requires a lateral run. Insert barbed connectors into the holes, then attach 1/4-inch micro-tubing to route water into the bed interior.
- Establish Grid or Grid-Line Patterns: Inside the raised bed, lay out 1/4-inch drip line in parallel rows spaced 12 inches (30 cm) apart for dense plantings like leafy greens, or weave single lines with individual pressure-compensating emitter buttons placed 6 inches (15 cm) away from heavy feeders like tomatoes and squash.
- Flush the System: Before capping the ends of your lines, turn on the water spigot completely for 60 seconds. This flushes out any soil, PVC shavings, or debris that entered the pipes during installation. Cap the ends using "figure-8" end clamps or go-of-fittings.
- Test and Calibrate: Run the system for 20 minutes. Inspect every connection for leaks and check that the soil is receiving a uniform, vertical wetting pattern. Adjust your timer to run early in the morning—typically between 4:00 AM and 6:00 AM—to minimize evaporative loss and deter fungal outbreaks.
For further reading on optimal irrigation scheduling and water conservation techniques tailored to home horticulture, consult the University of California Division of Agriculture and Natural Resources.
4. Common Problems, Pests & Troubleshooting
Even the best-designed systems encounter hiccups. Here is how to diagnose and resolve the most frequent issues in raised bed drip irrigation:
- Symptom: Emitters at the end of the line are not dripping.
- Cause: Friction loss over long runs of 1/4-inch tubing, or system pressure is too low.
- Solution: Limit 1/4-inch micro-tubing runs to a maximum of 30 feet (9 meters). If you need longer runs, tap directly into the 1/2-inch main line closer to the problem area.
- Symptom: Tubing popping off barbed fittings repeatedly.
- Cause: Excessive water pressure or cold polyethylene tubing that hasn't expanded.
- Solution: Double-check your pressure regulator. To make fittings slide on easily without stretching the tubing, dip the end of the poly tubing in warm water for 15 seconds before pushing it over the barb. Secure with ratchet clamps if pressure remains high.
- Symptom: Mysterious leaks in the middle of a poly line.
- Cause: Rodent damage. Field mice, chipmunks, and squirrels frequently chew through black polyethylene tubing during dry summer months to access the water inside.
- Solution: Patch the chewed section using a 1/2-inch union coupler (or a 1/4-inch barbed coupler for smaller lines). If rodent damage persists, dust the lines lightly with cayenne pepper or switch to armored copper-laced drip tubing.
⚠️ Important Caution: Never apply systemic liquid fertilizers (fertigation) through a basic hose-end timer and standard drip system unless you have installed a certified reduced-pressure principle backflow preventer. Siphon action can draw chemical fertilizers, root-rot pathogens, and heavy metals backward into your domestic drinking water supply, posing a severe public health hazard.

5. Frequently Asked Questions
How long should I run my drip irrigation system for raised beds?
Most raised beds filled with a rich organic potting mix require watering for 30 to 45 minutes, 2 to 3 times per week, depending on ambient temperatures. Because raised beds drain faster than ground soil, frequent deep watering cycles are superior to short, daily sprinkles. Always perform a screwdriver test 24 hours after a cycle: push a 6-inch screwdriver into the soil. If it penetrates easily and comes out damp and soiled, your moisture depth is optimal.
Can I leave my drip irrigation system out over the winter?
In regions where winter temperatures drop below 32°F (0°C), leaving water inside polyethylene tubing will cause the water to freeze, expand, and split your lines and fittings. Before the first hard frost, turn off the water supply at the main spigot, disconnect your timer, filter, and pressure regulator, and use an air compressor to blow out any residual water trapped within the 1/2-inch main lines. Alternatively, drain the lines manually by opening all end caps.
What is the difference between drip tape and emitter tubing?
Drip tape is a thin-walled, flat polyethylene tube with pre-installed emitters spaced tightly (usually 8 to 12 inches apart). It is inexpensive and ideal for commercial setups or dense single-crop rows, but it typically lasts only 1 to 3 seasons. Emitter tubing (often called drip line) features thick-walled (0.6mm) brown or black polyethylene with built-in pressure-compensating emitters. It lasts 5 to 10 years, resists UV damage, and is the superior choice for permanent residential raised beds.
Why are my raised bed plants showing signs of underwatering despite the drip system running?
This usually happens for one of two reasons: either your emitter flow rate is too low for the soil's percolation rate, or the soil has become hydrophobic. When organic potting mixes dry out completely, they form a waxy coating that repels water, causing it to channel straight past the root ball. Hand-water the bed thoroughly with a wetting agent or liquid kelp extract to re-wet the soil profile, then adjust your drip timer to run longer cycles less frequently.
Related Guides
- What is the Drip Line of a Tree
- How to Start a Hydroponic Gardening System at Home
- Lions Tailing Trees
📋 Table of Contents ▼ Click to expand
Tags:
Keep reading
🌿 Related Plants You Might Like






PlantSavvyWorld
Editorial team
PlantSavvyWorld is an independent botanical education project. Articles are drafted with AI assistance, then edited and checked against university extension services, botanical garden collections and other published horticultural sources.