

Jelly Bean Plant
Sedum rubrotinctum

1. Botanical Overview & Natural Habitat
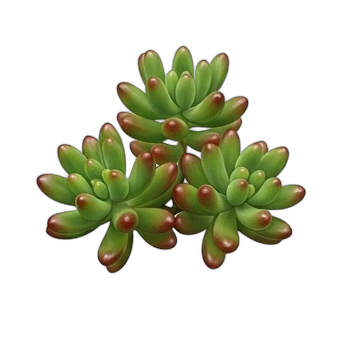
The Jelly Bean Plant, scientifically classified as Sedum rubrotinctum (synonym Sedum × rubrotinctum), belongs to the Crassulaceae family and the genus Sedum, commonly known as stonecrops. Native to the dry, rocky slopes and valleys of Mexico, this low-growing, evergreen succulent forms dense mats reaching heights of 6 to 8 inches (15 to 20 cm) and spreading outward up to 12 inches (30 cm) or more. Its signature feature is its plump, cylindrical leaves—resembling miniature jelly beans—which measure roughly 0.5 to 1 inch (1.2 to 2.5 cm) in length.
In its natural habitat, Sedum rubrotinctum experiences intense, unfiltered solar radiation and extended periods of drought. To survive, the plant evolved CAM (Crassulacean Acid Metabolism) photosynthesis, keeping its stomata closed during the scorching day to prevent moisture loss and opening them at night to fix carbon dioxide.
The most striking visual characteristic of the Jelly Bean Plant is its color-shifting foliage. Under normal, moderate light conditions, the leaves maintain a bright, grassy green. However, when subjected to high-intensity sunlight or cooler ambient temperatures—typically dropping below 50°F (10°C)—the plant synthesizes anthocyanin pigments, causing the tips or entire leaves to blush a vivid, translucent cherry red or bronze. This natural sunscreen protects its cellular machinery from photo-inhibition.
During the late winter to early spring months, mature specimens produce small, star-shaped, bright yellow flowers arranged in terminal cymes. While these blooms add a cheerful pop of color, they are rarely the primary reason growers cultivate the species; the architectural, bead-like foliage steals the show.
For those interested in balancing their succulent collections with contrasting tropical textures, you might look into the trailing architecture of the Lipstick Plant (Aeschynanthus Radicans) Complete Care & Bloom Guide, which thrives under very different humidity and moisture parameters.
2. Essential Environmental & Care Requirements
Mastering the cultivation of Sedum rubrotinctum requires replicating its native arid environment while managing the realities of indoor or temperate container gardening.
Light is the single most critical factor for this species. To achieve that iconic red stress-coloration and prevent etiolation—where stems stretch out weakly in search of light—your Jelly Bean Plant requires a minimum of 6 hours of direct sunlight daily. South-facing windowsills or unobstructed west-facing exposures are ideal indoors. If growing outdoors in USDA Hardiness Zones 9 through 11, it flourishes in full sun to partial afternoon shade.
Temperature thresholds are equally straightforward. While Sedum rubrotinctum can tolerate brief, light frosts down to 28°F (-2°C) if the soil is completely dry, prolonged freezes will rupture its water-storging cells, turning the stems into a mushy collapse. Protect the plant if temperatures drop below 32°F (0°C) for extended periods. Conversely, it handles summer heatwaves exceeding 95°F (35°C) with ease, provided it has adequate airflow.
Watering must follow the classic "soak and dry" methodology. Because the succulent leaves store copious amounts of water, you must allow the soil medium to dry out completely down to the bottom of the pot before applying water again. Depending on ambient humidity and container size, this usually translates to watering every 10 to 14 days in summer and every 30 to 45 days during the dormant winter months.
Substrate selection dictates root health. Standard potting soil retains too much moisture and will invite fungal pathogens. You need an ultra-porous mix, typically consisting of 50% high-quality cactus and succulent soil amended with 50% inorganic grit such as coarse pumice, perlite, or poultry grit. For optimal root development in containers, ensure your pot features drainage holes at least 0.5 inches (1.2 cm) wide.
| Parameter | Optimal Condition | Common Mistake | Why It Matters |
|---|---|---|---|
| Light | 6+ hours of direct sun daily | Low-light indoor placement | Prevents etiolation and triggers vibrant red leaf coloration |
| Soil Mix | 50% organic / 50% inorganic grit | Using standard potting soil | Prevents root rot by ensuring rapid drainage and aeration |
| Watering | Complete dry-out between waterings | Frequent, shallow sips | Encourages deep root anchoring and prevents stem edema |
| Temperature | 60°F – 85°F (15°C – 29°C) | Exposure to prolonged freezing | Avoids cellular rupture and structural collapse of leaves |
For further reading on how substrate composition impacts root behavior across different plant families, you can review the technical insights found in the How Deep Do Pepper Plant Roots Go? Pot Size & Substrate Depth Guide.
3. Step-by-Step Cultivation, Feeding & Propagation
Propagation is where the Jelly Bean Plant truly shines. Because every single leaf is a potential new clone, expanding your collection or starting fresh after a heavy prune is remarkably simple.
Step-by-Step Propagation Sequence (Leaf Cuttings)
- Select Healthy Stock: Choose plump, undamaged leaves from the middle or lower section of a mature, vibrant stem. Gently grasp the leaf and wiggle it slightly side-to-side until it snaps cleanly off the stem, ensuring the tiny base node remains intact. A torn base node significantly lowers strike rates.
- Callus the Wound: Place the harvested leaves in a dry, shaded location out of direct sunlight for 3 to 5 days. This allows the basal wound to form a protective callous, preventing bacteria and fungi from entering the tissue when introduced to moisture.
- Prepare the Propagation Bed: Fill a shallow tray or pot with a pre-moistened mix of 70% fine pumice and 30% succulent soil. Ensure the surface is level and lightly tamped down.
- Lay the Leaves: Lay the callused leaves flat upon the surface of the dry-to-slightly-damp medium. Do not bury them vertically; simply let them rest naturally.
- Initial Mist and Wait: Mist the soil surface lightly once every 5 to 7 days only after roots begin to emerge. Keep the tray in bright, indirect light. Within 14 to 21 days, tiny pink roots will anchor downward into the soil, closely followed by microscopic rosettes sprouting from the base node.
- Transplantation: Once the mother leaf shrivels up completely and drops off naturally—usually around 60 days—gently lift the newly established plantlet and pot it into its own individual container using standard succulent soil.
Feeding Sedum rubrotinctum requires a light hand. In its natural habitat, soils are lean and nutrient-deficient. Over-fertilization results in rapid, weak growth that ruins the compact, chubby aesthetic of the plant. Apply a balanced, water-soluble cactus and succulent fertilizer diluted to one-quarter strength precisely once in early spring and once in mid-summer. Never fertilize a dormant plant in winter.
💡 Pro-Tip: If you want your Jelly Bean Plant to develop an intensely cascading habit in a hanging basket, pinch off the growing tips of the main stems when they reach about 4 inches (10 cm) in length. This encourages lateral branching, doubling your stem density and creating a lush, tumbling display.
4. Common Problems, Pests & Troubleshooting
Even the most resilient succulents encounter environmental stress or opportunistic pests when grown out of their natural context.
Root Rot: The single most common cause of decline in Sedum rubrotinctum is overwatering combined with poor drainage. Symptoms include translucent, yellowing lower leaves that turn mushy, followed by blackened, rotting stems at the soil line. To remediate, unpot the plant immediately, use a sterile blade to slice away all infected brown tissue until you reach clean, white stem interior, let the cut end callus for 5 days, and replant in completely dry, fresh gritty substrate.
Leaf Drop: If your Jelly Bean Plant is shedding leaves at the slightest touch, it is usually suffering from overwatering or, conversely, severe, prolonged drought where the plant sacrifices its oldest leaves to sustain the core stem. Check your soil moisture meter; if the soil is soaking wet, reduce watering frequency immediately.
Pests: Mealybugs are the primary insect threat. These sap-sucking pests look like tiny tufts of white cotton nestled tightly in the leaf axils where the leaves meet the stem. They excrete sticky honeydew that can attract sooty mold.
⚠️ Important Caution: Never use standard horticultural oils or heavy insecticidal soaps on Sedum rubrotinctum during peak midday heat or direct sun exposure. The delicate waxy protective coating (farina) on the leaves can burn easily, leaving permanent cosmetic scars. Always treat pests in the early evening using 70% isopropyl alcohol applied directly to individual mealybugs with a cotton swab.

5. Frequently Asked Questions
Are jelly bean plants toxic to cats and dogs?
According to the ASPCA, Sedum rubrotinctum is considered non-toxic to domestic pets such as cats, dogs, and horses. However, if an animal ingests a large quantity of the leaves, it may experience mild gastrointestinal upset, vomiting, or diarrhea due to the accumulation of mild plant acids and minerals. It is always best practice to keep trailing succulents elevated or out of reach of curious chewers.
Why is my jelly bean plant turning green and losing its red tips?
The vibrant red or bronze stress-coloration on a Jelly Bean Plant is directly tied to the intensity of sunlight and environmental stress (such as cool temperatures). If your plant is turning entirely green, it is almost certainly not receiving enough direct sunlight. Move the plant to a sunnier location—such as a south-facing windowsill—or introduce a dedicated LED grow light for 12 hours a day to restore the pigmentation within 2 to 3 weeks.
How often should I water a potted jelly bean plant indoors?
As a general rule, you should water your indoor Jelly Bean Plant every 10 to 14 days during the active growing season (spring and summer), but only after the soil has dried out completely all the way to the bottom of the pot. During the winter dormancy period, reduce watering to once every 30 to 45 days. Always test the soil depth with a wooden chopstick or moisture meter before watering to ensure no hidden dampness remains near the root ball.
Can jelly bean plants grow outdoors year-round?
Sedum rubrotinctum can be grown outdoors year-round only in USDA Hardiness Zones 9 through 11, where winter temperatures rarely drop below 25°F (-4°C) to 30°F (-1°C). If you live in a cooler climate with freezing winters, you must cultivate the plant in containers that can be easily moved indoors before the first autumn frost. For further insights into climate adaptation and botanical resilience, consult resources provided by the Royal Horticultural Society or the University of California Division of Agriculture and Natural Resources.
📋 Table of Contents ▼ Click to expand
Tags:





