

Putting Rock Border Around House Foundations
Written with AI assistance, edited and checked against horticultural sources.
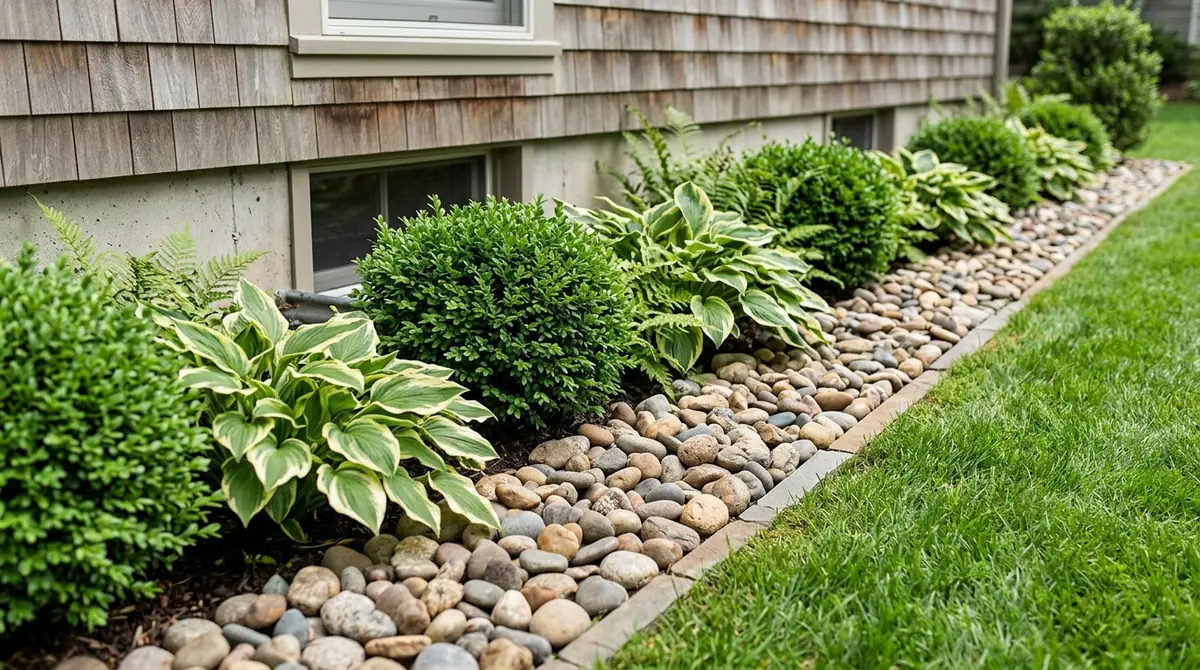
During a standard 2-inch (5 cm) rainstorm, water can pool ominously against southern foundation walls when rounded river rocks are carefully stacked directly against brickwork, as this creates a damp, anaerobic microclimate teeming with subterranean termites and rotting mortar joints. Putting rock border around house foundations is one of the most frequently requested landscaping upgrades, yet it is also one of the most misunderstood. Done right, it creates an efficient thermal break, deters pests, and prevents moisture infiltration. Done wrong, it acts as a subterranean sponge that threatens the structural integrity of your home.
1. Botanical Overview & Natural Habitat

When translating this natural concept to the perimeter of a residential foundation, we must evaluate how stone interacts with both architectural materials and perimeter plantings. A well-designed rock border does not exist in a vacuum; it typically transitions from the sterile foundation wall to drought-hardy, tap-rooted flora that can handle reflected heat and restricted root zones.
Understanding the thermal properties of stone is essential. Basalt, granite, and river stones absorb ambient heat, maintaining surface temperatures up to 15°F to 20°F (-9°C to -6°C) higher than ambient air during peak summer afternoons (95°F / 35°C). This creates a specialized xeriscape microclimate. If you are integrating softer landscape features nearby—such as managing turf or working around mature specimens using techniques from our guide on Creative Landscaping Ideas Around Tree Roots—you must maintain a strict physical separation between moisture-retentive organic mulches and mineral stone borders to prevent root collar rot.
2. Essential Environmental & Care Requirements
Installing a perimeter rock border requires strict adherence to grading, moisture management, and spatial clearances. The primary objective of any foundation border is moisture diversion, not merely aesthetic containment.
| Parameter | Optimal Condition | Common Mistake | Why It Matters |
|---|---|---|---|
| Foundation Clearance | Minimum 4 inches (10 cm) of exposed foundation wall | Piling rocks above the siding or weep screed | Prevents wood rot, termite access, and moisture bridging |
| Slope / Grade | 6 inches (15 cm) drop over the first 10 feet (3 m) away from the house | Creating a flat or negative slope toward the wall | Directs surface water away from the basement or crawlspace |
| Barrier Depth | Heavy-duty non-woven geotextile fabric (min. 4 oz/sq yd) | Using cheap plastic sheeting or skipping fabric | Stops weed germination while maintaining soil respiration |
| Stone Size | 1.5 to 3 inches (3.8 to 7.6 cm) diameter river rock or crushed stone | Using fine pea gravel exclusively | Pea gravel shifts easily underfoot, migrates into soil, and traps debris |
For further technical specifications on managing perimeter water loads, consult the USDA National Resources Conservation Service guidelines on urban soil and water management.
💡 Pro-Tip: Never let your rock border touch wooden siding, stucco weeping holes, or brick veneer weep screeds. Maintain a strict 2-inch (5 cm) gap filled with clean air or inert metal flashing between the top of your stone layer and any vulnerable building material to eliminate moisture bridges.
3. Step-by-Step Cultivation, Feeding & Propagation
Laying a durable rock border is a construction process rooted in landscape science. Follow this precise protocol to ensure long-term stability and foundation protection.
- Mark the Perimeter: Measure out a width of 18 to 24 inches (45 to 61 cm) from the foundation wall. Spray paint the outer edge to define your trench line.
- Excavate the Trench: Dig down to a depth of 3 to 4 inches (7.6 to 10 cm). As you dig, verify that the sub-grade slopes away from the house at a minimum rate of 0.5 inches per foot (4 cm per meter).
- Compact the Sub-Grade: Tamp the excavated soil firmly using a hand tamper or plate compactor to prevent future settling and shifting of the stone bed.
- Install Edging: Place heavy-duty aluminum, steel, or thick poly landscape edging along the outer trench line, securing it with 10-inch (25 cm) steel stakes driven every 3 feet (1 m).
- Lay Geotextile Fabric: Roll out a high-grade, UV-stabilized, non-woven geotextile fabric across the trench. Cut precise slits to fit snugly around any permanent drainage pipes or utility lines. Avoid woven plastic tarps, which prevent necessary soil moisture evaporation.
- Apply the Aggregate Layer: Shovel your chosen stone (such as 2-inch angular crushed basalt or smooth river rock) over the fabric. Rake the stones to a uniform depth of 3 inches (7.6 cm).
- Rinse and Settle: Spray the entire rock border thoroughly with a high-pressure hose nozzle to wash away fine stone dust and settle the aggregate into a stable matrix.
⚠️ Important Caution: Avoid limestone-based rocks (like marble chips or limestone gravel) if you are planting acid-loving shrubs like azaleas, rhododendrons, or blueberries nearby. Limestone leaches calcium carbonate, raising the soil pH and causing severe chlorosis and iron lockout in acidophiles.
If your landscaping project involves incorporating water features near your foundation drainage system, review our expert steps on How to Make a Bubbling Rock Fountain to ensure proper waterproofing and pump placement.
4. Common Problems, Pests & Troubleshooting
Even with careful installation, rock borders can present distinct challenges over time. Here is how to diagnose and correct them.
- Weed Growth in Stones: Wind-blown seeds settle in the organic dust that accumulates between rocks over 12 to 18 months. Do not use systemic herbicides near your foundation if avoidable; instead, use a high-temperature propane weed torch or manually pull weeds after a heavy rain when the taproots slide easily out of the geotextile fabric.
- Standing Water Pools: If water fails to drain away from the foundation, your sub-grade slope may have settled. Lift the rocks in the affected area, add coarse backfill sand to re-establish a positive slope, and relay the fabric and stones.
- Pest Infestations (Ants, Roaches, Rodents): Large stones provide cool, damp daytime harborages for pests. Keep the inner 6 inches (15 cm) of your rock border entirely clear of decaying leaves and organic mulch. For authoritative pest management strategies, visit the Royal Horticultural Society pest advice portal.
- Stone Migration: Foot traffic or heavy downpours can cause stones to spill onto lawns or flower beds. Deepening your metal or composite edging to 4 inches (10 cm) below grade permanently locks the perimeter in place.

5. Frequently Asked Questions
Should I put plastic under rocks around my house?
No. Never use solid plastic sheeting or cheap weed barrier film beneath a foundation rock border. Solid plastic creates a waterproof barrier that traps condensation and rainwater against the soil, causing water to pool toward your foundation walls and suffocating beneficial soil microbes. Always use a professional-grade, permeable non-woven geotextile fabric that allows gas exchange while blocking weed growth.
How wide should a rock border be around a house?
A standard foundation rock border should be a minimum of 18 to 24 inches (45 to 61 cm) wide. This width is wide enough to catch roof runoff drip lines, prevent lawn mower damage to siding, and create an effective thermal and biological buffer against crawling pests.
Is river rock or crushed stone better for foundation landscaping?
Both have distinct advantages. Crushed stone (such as angular granite or trap rock) has jagged edges that lock together, making it much more stable to walk on and less likely to roll or migrate. Smooth river rock offers a softer, highly decorative aesthetic, but it can shift underfoot and requires deeper containment edging to stay put.
Does a rock border attract termites?
Rocks themselves do not attract termites, but organic debris that collects between the rocks—such as wind-blown leaves, pine needles, and decomposing mulch—creates an ideal food source and moisture trap for subterranean termites. Keeping your rock border free of organic buildup and maintaining a clear visual gap between the stones and wooden structural elements eliminates this risk.
Related Guides
- How to Make a Bubbling Rock Fountain
- Creative Landscaping Ideas Around Tree Roots
- Anthurium Villenaorum Croat
📋 Table of Contents ▼ Click to expand
Tags:
Keep reading
🌿 Related Plants You Might Like






PlantSavvyWorld
Editorial team
PlantSavvyWorld is an independent botanical education project. Articles are drafted with AI assistance, then edited and checked against university extension services, botanical garden collections and other published horticultural sources.