

How to Grow Huge Tomato Plants: Pruning, Trenching & Heavy Yields
Written with AI assistance, edited and checked against horticultural sources.
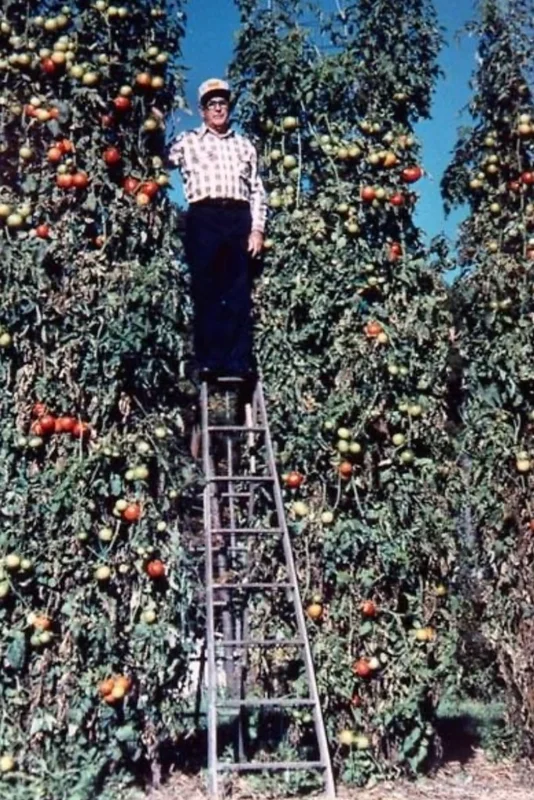
Hello fellow plant enthusiasts! It's the PlantSavvyWorld editorial team here from PlantSavvyWorld, and I still vividly remember the first time I saw a truly monstrous indeterminate tomato plant. It wasn't just the sheer size, but the cascading clusters of ripe fruit, weighing down a cage that looked like it might buckle. I was convinced it was a horticultural miracle. Turns out, it was just smart gardening, and today, I'm thrilled to share the secrets to achieving those same jaw-dropping results in your own garden. Growing huge tomato plants, especially indeterminate varieties, isn't about luck; it's about understanding a plant's innate biology and giving it the precise conditions it needs to thrive and produce abundantly.
1. Botanical Overview & Natural Habitat

The secret to their potential for huge growth lies in their ability to develop adventitious roots. These are roots that grow from non-root tissues, such as stems and leaves. When a tomato stem is buried in moist soil, it can sprout a dense network of these adventitious roots, creating a vastly superior anchoring and nutrient-absorbing system compared to the single root ball a shallowly planted seedling might develop. This dramatically increases the plant's capacity to draw water and nutrients, fueling the production of enormous vines laden with fruit.
Understanding apical dominance is also crucial. This is the phenomenon where the terminal bud (at the tip of the main stem) inhibits the growth of lateral buds (those that form branches or "suckers"). By strategically managing these suckers, we can direct the plant's energy towards thickening the main stem and producing fruit rather than expending it on excessive leafy growth.
2. Essential Environmental & Care Requirements
Achieving those gargantuan tomato plants and heavy yields hinges on providing the perfect environmental cocktail. It’s a delicate balance of sunlight, water, and nutrients, all working in harmony.
| Parameter | Optimal Condition | Common Mistake | Why It Matters |
|---|---|---|---|
| Planting Method | Horizontal Trench (Bury 70% of stem) | Shallow vertical planting | Triggers adventitious root formation along the buried stem, creating a 300% larger root mass for superior anchoring and nutrient uptake. |
| Sunlight | 8 to 10+ hours of direct sunlight | Partial tree shade (<6 hours) | Fuels high photosynthetic carbon fixation necessary for sugar accumulation, leading to sweeter, more abundant fruit. Insufficient light results in leggy, unproductive plants. |
| Hydration | Deep, consistent soaking at the base of the plant | Overhead, shallow, frequent sprinkling | Eliminates blossom end rot by ensuring consistent calcium uptake and prevents fungal diseases like early blight (Alternaria) by keeping foliage dry. |
| Nutrient Balance | Low initial Nitrogen / High Phosphorus & Potassium focus | Excess synthetic high-nitrogen fertilizer | Prevents the "vegetative trap"—giant, bushy foliage with little to no fruit set. Promotes strong root development and flowering/fruiting. |
| Soil pH | 6.0 to 6.8 | Soil too acidic (<5.5) or too alkaline (>7.5) | Optimal pH ensures nutrient availability. At extremes, essential nutrients like calcium, magnesium, and phosphorus become locked up, unavailable to the plant. |
| Temperature | Daytime: 70-85°F (21-29°C); Nighttime: 60-70°F (15-21°C) | Extreme fluctuations, prolonged heatwaves (>95°F) | Consistent, warm temperatures are ideal for flowering and fruit set. Extreme heat can cause flower drop and poor pollination. |
When transplanting tomato seedlings, it's tempting to just pop them into the ground vertically. However, for truly massive plants, I employ a technique that shocks the system into producing an incredible root network.
💡 Pro-Tip: "When transplanting tomato seedlings, strip off all lower branches and lay the stem sideways in a 4-inch (10 cm) deep trench with just the top 2 sets of leaves pointing up. Within 10 days, hundreds of new feeder roots emerge along the buried stem, creating an anchor system that supports 10-foot monster vines and fuels heavy fruit production."
This technique is transformative. The buried stem segments are packed with dormant buds that readily sprout into adventitious roots, creating a root system far more extensive than what a conventionally planted seedling would develop. This robust root structure is the foundation for supporting a plant that can reach impressive heights and bear a significant weight of fruit.
3. Step-by-Step Cultivation, Feeding & Propagation
Let's dive into the actionable steps to cultivate these tomato titans. This protocol is designed to maximize growth, support, and yield.
1. Site Preparation & Trench Planting
- Timing: Begin preparations when your last frost date has passed and nighttime temperatures consistently stay above 50°F (10°C).
- Location: Select a spot that receives at least 8-10 hours of direct sunlight per day. Full sun is non-negotiable for heavy fruiting.
- Soil Enrichment: Dig a trench that is approximately 4-6 inches (10-15 cm) deep and wide enough to accommodate the length of your seedling's stem. Loosen the soil at the bottom of the trench.
- Amending the Trench: Mix in generous amounts of well-rotted compost, aged manure, bone meal (for phosphorus), and worm castings. Bone meal is particularly beneficial at this stage to encourage strong root development. Aim for a blend that is rich in organic matter and balanced in nutrients. If your soil is heavy clay, incorporate perlite or coarse sand to improve drainage.
- Plant Preparation: Gently remove the lowest sets of leaves from your tomato seedling. You'll want to bury about two-thirds to three-quarters of the stem.
- Planting: Lay the prepared seedling horizontally in the trench, curving the top portion (with the remaining leaves) upwards so that only the top two sets of leaves and the tip are exposed above the soil surface. Gently backfill the trench, firming the soil around the stem. Water thoroughly.
2. Trellising & Support
- Timing: Install your support system before or immediately after planting. It's far easier to do this when the plants are small.
- Type of Support: For huge indeterminate vines, you need serious support. Options include:
- Sturdy Stakes: Use thick, robust wooden or metal stakes at least 6-8 feet (1.8-2.4 m) tall, driven deeply into the ground. You'll need to tie the main stem to these as it grows.
- Cages: Heavy-duty tomato cages made from thick gauge wire can work, but ensure they are very tall and sturdy, as massive vines can become top-heavy.
- Florida Weave: This technique uses stakes placed every 2-3 feet (0.6-0.9 m) and weaves twine or netting horizontally between them as the plant grows, providing support along the entire vine.
- Trellises/Arbors: For the most impressive displays, consider building a robust trellis system or an arbor that the vines can grow up and over. Cattle panels (50 ft rolls of welded wire fencing) can be bent into arches for a very strong, semi-permanent structure.
- Capacity: Ensure your chosen support system can reliably hold 50+ lbs (23+ kg) of fruit per vine, as these giants can become incredibly heavy.
3. Pruning for Productivity (Indeterminate Varieties Only)
This is where apical dominance comes into play. The goal is to prune away "suckers" to channel the plant's energy into growing a strong main stem and producing fruit, not endless leafy growth.
- Identify Suckers: Suckers are small shoots that grow in the "axil" – the V-shaped joint between the main stem and a leaf branch.
- When to Prune: Begin pruning as soon as you notice suckers forming. It's easiest to do this when they are small, about 1-4 inches (2.5-10 cm) long.
- What to Prune: Pinch or snip off all suckers that form below the first or second flower cluster. This directs energy to the main stem and the developing fruit.
- Above the First Cluster: Above the first (or sometimes second) fruit cluster, you can be a bit more lenient. Allowing one or two strong suckers to grow can create a "two-trunked" plant, increasing your overall yield potential. However, be cautious not to allow too many.
- Regularity: Check your plants every few days and remove new suckers as they appear. This consistent effort pays off.
- What NOT to Prune: Never prune determinate (bush) varieties. They produce a set crop and pruning removes future fruit. Also, avoid removing leaves unless they are diseased or yellowing, as leaves are vital for photosynthesis.
⚠️ Important Caution: Never prune determinate (bush) tomato varieties. Their growth habit is genetically programmed to produce a concentrated crop. Pruning their stems will remove the flower clusters that form on the ends of those stems, drastically reducing your harvest. Only indeterminate (vining) varieties benefit from sucker pruning.
4. Feeding for Heavy Yields
Once your tomato plants are established and start setting fruit, it's time to feed them for abundant production. This is where we focus on phosphorus and potassium, which are crucial for flowering and fruit development, while keeping nitrogen in check to avoid excessive foliage.
- Initial Feeding (Transplant): If you didn't heavily amend your trench, a light feeding with a balanced organic fertilizer or a high-phosphorus starter fertilizer can be beneficial a week or two after planting.
- Fruiting Phase Feeding: Once you see the first fruits starting to form:
- Frequency: Feed your plants every 14 days.
- Materials: Use a combination of:
- Organic Fish Bone Meal: A great source of phosphorus and calcium.
- Sulfate of Potash (Potassium Sulfate): Potassium is vital for fruit development, disease resistance, and overall plant vigor.
- Soluble Calcium: A liquid calcium supplement can be applied as a foliar spray or watered into the soil to help prevent blossom end rot. Epsom salts can also provide magnesium, which aids nutrient uptake.
- Application: You can either water in granular fertilizers around the base of the plant (keeping them a few inches away from the stem) or use a liquid feed mixed with water.
4. Common Problems, Pests & Troubleshooting
Even the most robust tomato plants can face challenges. Understanding common issues and how to address them will ensure your efforts aren't in vain.
Blossom End Rot (BER)
- What it looks like: A dark, leathery, sunken spot on the blossom end of the tomato.
- Cause: This is a physiological disorder, not a disease or pest. It occurs due to a localized calcium deficiency in the developing fruit. While calcium might be present in the soil, inconsistent watering is the primary culprit. Fluctuations in moisture disrupt the plant's ability to transport calcium to the fruit.
- Solutions:
- Consistent Watering: This is paramount. Water deeply and regularly, aiming for about 1-2 inches (2.5-5 cm) of water per week, depending on your climate. Use drip irrigation or soaker hoses to deliver water directly to the root zone and avoid wetting foliage.
- Mulching: Apply a thick layer of organic mulch (straw, compost, shredded bark) around the base of the plants to help retain soil moisture and moderate soil temperature.
- Calcium Supplementation: In cases of severe deficiency or if watering cannot be consistent, a foliar spray of calcium chloride or calcium nitrate can provide a quick boost. Ensure your soil pH is in the optimal range (6.0-6.8) for calcium uptake.
Early Blight ( Alternaria solani )
- What it looks like: Dark spots on leaves, often with concentric rings resembling a target. These spots can enlarge, and the leaves may turn yellow and drop. It typically starts on lower leaves and moves upwards.
- Cause: A fungal disease favored by warm, humid conditions and wet foliage.
- Solutions:
- Good Air Circulation: Proper spacing between plants and pruning to remove dense foliage helps air move freely, drying leaves faster.
- Watering Practices: Water at the base of the plant and avoid overhead watering, especially in the evening.
- Remove Infected Leaves: Promptly remove and discard any infected leaves. Do not compost diseased plant material.
- Crop Rotation: Avoid planting tomatoes (and other solanaceous crops like peppers, eggplants, potatoes) in the same spot year after year.
- Fungicides: Organic fungicides containing copper or Bacillus subtilis can be applied preventatively or at the first sign of infection.
Tomato Hornworms ( Manduca quinquemaculata )
- What they look like: Large, green caterpillars with distinctive "horns" on their rear end. They are voracious eaters and can strip a plant bare overnight. Look for their large, dark droppings (frass) on leaves.
- Cause: Moth larvae feeding on tomato foliage.
- Solutions:
- Handpicking: This is the most effective method. Regularly inspect your plants, especially in the early morning or late evening, and simply pick them off and drop them into a bucket of soapy water.
- Bacillus thuringiensis (Bt): This is a naturally occurring bacterium that is toxic to caterpillars. It's an organic option that can be sprayed on the plants. It’s most effective when the caterpillars are younger and smaller.
- Encourage Natural Predators: Ladybugs, lacewings, and parasitic wasps can help control hornworm populations.
Yellowing Leaves
- Causes: Can be a sign of many things, including overwatering, underwatering, nutrient deficiency (especially nitrogen or magnesium), or natural aging of lower leaves.
- Solutions:
- Assess Watering: Check soil moisture. If too wet, reduce watering. If too dry, water deeply.
- Nutrient Check: If the plant is otherwise healthy, a dose of balanced liquid fertilizer or a magnesium boost (Epsom salts, 1 tablespoon per gallon of water, applied around the base) can help. Yellowing starting from the tips and moving inward often indicates nitrogen deficiency.
- Lower Leaf Aging: It's normal for the very lowest, oldest leaves to yellow and eventually die off. If this is localized to the bottom of the plant and new growth looks healthy, it's usually not a cause for alarm.

5. Frequently Asked Questions
What are "suckers" and should I always prune them?
Suckers are the small shoots that grow in the V-shaped joint between a tomato stem and a leaf branch. For indeterminate (vining) tomato varieties, pruning suckers, especially those below the first few fruit clusters, is crucial. This directs the plant's energy into developing a strong main stem and producing fruit, rather than creating excessive foliage. However, you can often leave one or two strong suckers to grow as secondary main stems for increased yield. Never prune suckers from determinate (bush) varieties, as this will remove flower and fruit production sites.
My tomatoes have black, leathery spots on the bottom. What is wrong?
This is almost certainly Blossom End Rot (BER). It's a physiological disorder caused by inconsistent watering leading to irregular calcium uptake by the developing fruit. Ensure you are watering deeply and consistently, especially during dry periods. Mulching helps retain soil moisture. Avoid sudden drying out of the soil followed by overwatering.
How much sun do tomato plants really need for huge yields?
Tomato plants are sun-lovers! For massive growth and heavy fruit production, aim for a minimum of 8 to 10 hours of direct sunlight per day. Less sun will result in leggy plants with fewer, smaller fruits. If your garden is naturally shaded for part of the day, consider growing tomatoes in containers that can be moved to the sunniest spots.
When is the best time to fertilize my tomato plants for maximum fruit?
The feeding strategy changes as the plant grows. Initially, focus on root development with phosphorus. Once the plant starts to flower and set fruit (typically 4-6 weeks after transplanting), switch to fertilizers higher in phosphorus and potassium. Feed every 14 days with organic options like fish bone meal and sulfate of potash, and supplement with calcium to prevent blossom end rot. Avoid high-nitrogen fertilizers once flowering begins, as this will encourage leafy growth at the expense of fruit.
Further Reading
Tags:
Keep reading
🌿 Related Plants You Might Like






PlantSavvyWorld
Editorial team
PlantSavvyWorld is an independent botanical education project. Articles are drafted with AI assistance, then edited and checked against university extension services, botanical garden collections and other published horticultural sources.