

Zwartkop Aeonium
Aeonium arboreum 'Zwartkop'
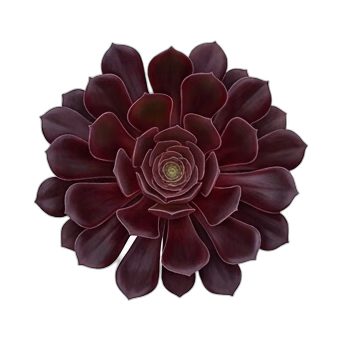
I first encountered Aeonium arboreum 'Zwartkop' fifteen years ago during a scorching July landscape consultation in Zone 9b. The gardener's entire perennial border was crisping into gray straw, yet right against the blistering south-facing stucco wall sat a monolithic, midnight-black rosette glowing with an uncanny, waxy luminescence. It looked like an architectural bronze cast dropped into a sea of green weeds. I reached out, brushed the dust-free, obsidian leaves, and realized right then that this Canary Island native was not your average, gentle succulent. It is a bold, subtropical structural artist that commands attention and rewards correct care with astonishing visual gravity.
1. Botanical Overview & Natural Habitat

Unlike many desert succulents that store water exclusively in fat leaves to survive baking heat, Aeonium arboreum and its dark cultivar are winter-growing (hibernating) plants. They experience active metabolic growth from October through April when temperatures are moderate and rainfall occurs, and they enter a semi-dormant, protective state during the peak heat of July and August.
Morphologically, 'Zwartkop' forms sturdy, branching woody stems that can eventually reach heights of 3 to 4 feet (90 to 120 cm) with a spread of 2 feet (60 cm). At the terminal ends of these bare, charcoal-colored branches sit dinner-plate-sized rosettes measuring 8 to 12 inches (20 to 30 cm) across. The leaves are spatulate, fleshy, and coated with a thin, glaucous cuticle that gives them a velvety matte texture.
The color is its most famous trait, shifting from a rich burgundy-green in lower light to an ink-black purple when exposed to high-intensity ultraviolet radiation. In late winter to early spring, mature rosettes older than 3 to 4 years may produce a dramatic, terminal conical panelle of bright yellow, star-shaped flowers. Because this inflorescence emerges directly from the center of the rosette, that specific stem will die back after seed production—a monocarpic trait you must understand to keep your specimen looking pristine. For a deeper taxonomic history, you can review the Royal Horticultural Society Plant Finder.
2. Essential Environmental & Care Requirements
Growing 'Zwartkop' successfully requires matching its native maritime cliff-side environment. This means brilliant sunshine, fast-draining gritty soil, and an understanding of its unique winter-active life cycle.
| Parameter | Optimal Condition | Common Mistake | Why It Matters |
|---|---|---|---|
| Light Exposure | 6+ hours direct sun (Full Sun to Partial Shade) | Placing in deep indoor shade | Leaves revert to a muddy green; stems stretch and weaken. |
| Temperature Range | 65°F to 80°F (18°C to 27°C) | Exposing to frost below 30°F (-1°C) | Cell walls burst under freezing conditions, turning stems to mush. |
| Soil Mix | Gritty, fast-draining cactus/succulent blend (pH 6.0–7.5) | Heavy organic potting soil or garden loam | Retains too much moisture, inviting fatal Pythium and Phytophthora root rot. |
| Watering Schedule | Deep soak when soil is bone dry 2 inches (5 cm) down | Frequent, shallow sips | Starves deep roots and keeps surface soil constantly damp. |
Light is the master regulator for this plant. If your 'Zwartkop' is turning a bright, muddy apple green, it is starving for ultraviolet light. Move it incrementally into brighter exposure over 14 days to transition its photosynthetic pigments safely into that signature near-black shade.
Temperature tolerance is another critical factor. While it thrives in USDA Hardiness Zones 9 through 11, it can tolerate brief dips to 30°F (-1°C) if the soil is dry. However, sustained freezes below 28°F (-2°C) will destroy the water-laden vascular tissue. If you live in a colder climate, treat it as a container specimen that you overwinter indoors near a south-facing window or under supplemental LED grow lights for 12 to 14 hours daily.
Watering must respect its seasonal dormancy. During spring and autumn, water thoroughly until it runs out of the drainage holes, then let the soil dry completely. In the dead of summer, when the lower leaves may curl inward to conserve moisture and the plant rests, cut watering down to a mere splash every 21 to 28 days just to keep the feeder roots from completely desiccating. Conversely, winter rains in mild climates provide all the hydration it needs.
3. Step-by-Step Cultivation, Feeding & Propagation
Propagation is where 'Zwartkop' truly shines as a rewarding garden specimen. Because it branches naturally over time, you will frequently find yourself with heavy, top-heavy rosettes that beg to be cut back.
💡 Pro-Tip: Never discard the woody, headless stems left behind after you prune a top rosette. Even if a stem looks entirely dead and dry, leave it planted in the pot; dormant meristematic buds along the bark will often erupt with a cluster of 3 to 5 baby rosettes within 30 to 45 days.
Follow this precise protocol for stem-cutting propagation to multiply your collection:
- Select the Stem: Choose a healthy, vibrant rosette in mid-spring with at least 4 to 6 inches (10 to 15 cm) of straight stem below the leaves.
- Sanitize and Cut: Sterilize a sharp pruning blade with isopropyl alcohol. Cut cleanly through the stem, making sure the cut is smooth and free of bruising.
- Cure the Wound: Place the cutting in a warm, dry, shaded indoor location for 5 to 7 days. This allows the cut surface to callous over completely, preventing soil-borne pathogens from entering the open vascular tissue.
- Prepare the Substrate: Fill a clean container with a dry mix consisting of 50% coarse horticultural perlite or pumice and 50% standard succulent potting mix.
- Plant the Cutting: Insert the calloused stem 1.5 to 2 inches (3.8 to 5 cm) deep into the dry medium. Prop the stem with small decorative stones if it tends to wobble.
- Withhold Water: Keep the newly potted cutting completely dry for the first 14 days. Without roots, it cannot take up moisture; moisture will only rot the stem.
- Initiate Rooting: After 14 days, give the soil a light misting. Begin watering thoroughly only after you notice new resistance when gently tugging the rosette, which indicates active root development (usually by day 28).
Feeding should be approached conservatively. 'Zwartkop' is adapted to nutrient-poor volcanic soils. Apply a balanced, water-soluble, low-nitrogen fertilizer diluted to quarter-strength just once in early spring as its active growth cycle begins. Skip feeding entirely during its summer dormancy.
4. Common Problems, Pests & Troubleshooting
Even the most resilient succulents encounter issues when indoor or microclimate conditions drift out of balance.
Root rot is the single greatest threat to Aeonium arboreum 'Zwartkop'. It manifests as a sudden blackening and softening of the lower stem, paired with rosettes that easily detach from the base. If you catch it early, use a sterile blade to slice away all decayed tissue upward until you see clean, pale-green interior rings. Dust the wound with powdered sulfur or cinnamon, let it callous for 10 days, and restart it as a cutting.
Pests are relatively rare thanks to the waxy leaf cuticle, but mealybugs and aphids can occasionally colonize the tight, protected nooks at the base of the central rosette leaves. You will spot them as tiny white, cottony masses or sticky honeydew residue. Wash them away with a strong jet of water, or apply horticultural soap spray directly into the affected crevices during the evening hours to avoid solar leaf burn.
⚠️ Important Caution: Never use standard petroleum-based horticultural oils or heavy insecticidal sprays on 'Zwartkop' during peak afternoon sun. The combination of chemical oils and high UV intensity will strip the waxy leaf coating and cause irreversible, blistering chemical burns across the foliage.

5. Frequently Asked Questions
Why are the leaves on my Zwartkop Aeonium turning green instead of black?
Your plant is not receiving enough direct sunlight or ultraviolet radiation. While 'Zwartkop' can survive in partial shade, its dramatic dark pigmentation is a natural sun-protection response. Move the plant gradually into a location where it receives at least 6 hours of direct sun daily, and the new leaves emerging from the center will return to their rich, obsidian tone.
How do I water a Zwartkop Aeonium during its summer dormancy?
Radically reduce your watering frequency during July and August when the plant pauses its growth to cope with high heat. Instead of your normal weekly or bi-weekly drenching, give the soil a light, shallow splash just around the base every three to four weeks. This keeps the root system from shriveling completely while preventing the dampness that causes rot when root metabolism is dormant.
Should I cut off the yellow flowers on my Zwartkop Aeonium?
You can leave them to admire their bright, star-like contrast against the dark foliage, but be prepared for the consequence. The specific rosette that produces the terminal flower spike is monocarpic, meaning it will die after the bloom finishes and seeds drop. Fortunately, this flowering process almost always triggers the parent stem to push out vigorous new side branches just below the spent bloom.
Why is my Zwartkop Aeonium losing its lower leaves rapidly?
If the lower leaves are turning brown, papery, and dropping off one by one while the top rosette remains firm and colorful, this is normal shedding as the plant builds its woody trunk. However, if the lower leaves are turning mushy, translucent, or yellow en masse, you are overwatering or the soil drainage is inadequate, leading to early-stage root rot.
📋 Table of Contents ▼ Click to expand
Tags:





