

Echeveria
Echeveria elegans
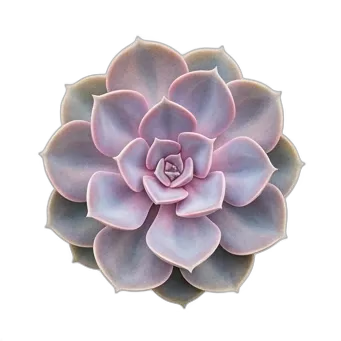
When setting shears against a congested cluster of Echeveria elegans, understanding the precise physiological rhythms baked into this genus through millions of years of evolutionary adaptation to arid, rocky slopes prevents miscalculated snips. A Mexican snowball with an overgrown, woody stem that threatens to topple its entire rosette can be safely managed by separating the tight apical head from its subterranean roots. That structural resilience is precisely why Echeveria remains the crown jewel of succulent design, rewarding attentive growers with unmatched geometric beauty when treated with botanical respect.
1. Botanical Overview & Natural Habitat

Understanding their natural habitat is the single most important step in mastering their cultivation. In the wild, Echeveria species like Echeveria elegans (commonly known as the Mexican snowball or white Mexican rose) grow perched on steep, vertical rock faces, cliff crevices, and shaded ledges at elevations ranging from 3,,200 to 8,500 feet (1,000 to 2,600 meters). These environments dictate their physical architecture and physiological machinery:
- Leaf Morphology: The thick, fleshy leaves are water-storage organs adapted to survive prolonged periods of drought. Many species exhibit a powdery, waxy coating known as farina. This delicate, chalky substance acts as a natural sunscreen, reflecting intense ultraviolet radiation and preventing moisture loss through cuticular transpiration.
- Root Systems: Naturally adapted to shallow, stony soils, Echeveria possess fine, fibrous root systems that spread horizontally rather than plunging deeply. They require rapid drainage; sitting in stagnant water for even a few hours can trigger fatal fungal pathogens.
- Photosynthetic Pathway: Like many succulents, Echeveria utilize Crassulacean Acid Metabolism (CAM) photosynthesis. Instead of opening their stomata during the heat of the day—which would cause rapid dehydration—they open them at night to capture carbon dioxide, storing it as malic acid until daylight enables sugar synthesis.
For a deeper dive into the taxonomy and structural classification of the Crassulaceae family, you can consult the Royal Horticultural Society Plant Finder.
2. Essential Environmental & Care Requirements
Translating the harsh, bright, and airy conditions of a Mexican cliffside into a domestic landscape or indoor container requires dialing in specific environmental parameters.
| Parameter | Optimal Condition | Common Mistake | Why It Matters |
|---|---|---|---|
| Light | 6–8 hours of bright, direct sunlight daily (or 2,500–5,000 foot-candles indoors) | Keeping them in low-light indoor corners or north-facing windows | Insufficient light triggers etiolation, causing stems to stretch and colors to fade. |
| Temperature | 65°F to 80°F (18°C to 27°C) active growth; minimum 40°F (4°C) dormant | Exposing plants to freezing temperatures below 32°F (0°C) | Water-filled leaf cells rupture when frozen, turning the plant to mush. |
| Soil Composition | Gritty, fast-draining mix (50% inorganic grit like pumice/perlite, 50% organic compost) | Planting in dense, heavy potting soil or garden loam | Heavy soils retain water too long, suffocating roots and inviting root rot. |
| Watering | "Soak and dry" method: water deeply until it runs out the base, then wait until soil is completely dry | Frequent, shallow sips of water every few days | Shallow watering encourages weak root development and leaves lower roots dry. |
To achieve the iconic stress colors—intense pinks, purples, and blues—Echeveria require a combination of high light intensity and cool nighttime temperatures between 50°F and 55°F (10°C and 13°C).
💡 Pro-Tip: Never water Echeveria directly overhead if you can avoid it. Puding water in the center of the rosette acts like a magnifying glass under intense sun, burning the leaves, and provides a breeding ground for crown rot. Always water directly onto the soil surface, or use bottom-watering by placing your pot in a tray of water for 20 minutes until the medium is saturated from below.
3. Step-by-Step Cultivation, Feeding & Propagation
Propagation is where Echeveria truly shines. Because they produce offsets (commonly called "pups") and have leaves packed with totipotent cells—cells capable of dividing and developing into an entirely new plant—you can easily multiply your collection.
When your plant becomes top-heavy or develops a bare, woody stem, follow this step-by-step stem-cutting and propagation protocol:
- Sanitize Your Tools: Sterilize a sharp razor blade or horticultural shears using isopropyl alcohol (70% concentration or higher) to prevent transferring bacterial or fungal spores into the fresh plant wounds.
- Execute the Cut: Cut the main rosette stem roughly 1 to 2 inches (2.5 to 5 cm) below the lower leaves, leaving a clean, flat surface.
- Process the Lower Stem: Remove the lower 4 to 6 leaves from the harvested rosette by gently pulling them sideways until they snap off cleanly at the stem. Do not leave torn leaf bases behind, as they rot easily.
- Cure the Wounds: Place both the severed rosette and the stripped leaves in a warm, dry, shaded location for 3 to 7 days. This allows a protective callus to form over the cut surfaces, sealing out pathogens.
- Prepare the Propagation Tray: Fill a shallow nursery flat or terracotta pan with a dry, sterile propagation mix consisting of equal parts fine perlite and peat-free cactus compost.
- Lay and Wait: Lay the callused leaves flat on top of the soil surface without burying them. Plant the callused stem cutting upright into a small pot filled with dry gritty soil mix. Keep both in bright, indirect light and withhold all water for 14 to 21 days until tiny pink roots emerge seeking moisture.
- Initiate Watering: Once roots appear, mist the soil lightly every 3 to 4 days. As the mother leaf eventually shrivels and drops off the propagated pups over 30 to 60 days, transition the new plants to the standard "soak and dry" watering routine.
For additional scientific insights into plant propagation techniques and tissue behavior, reference the resources provided by the University of California Agriculture and Natural Resources.
4. Common Problems, Pests & Troubleshooting
Even with meticulous care, environmental shifts can trigger stress responses or invite opportunistic pests. Learning to read your plant's physical signals is the hallmark of an expert designer.
- Etiolation (Stretching): If your Echeveria begins losing its compact, rose-like symmetry and the spaces between leaves (internodes) lengthen drastically, the plant is starving for light. Move it immediately to a sunnier exposure or supplement with a full-spectrum LED grow light positioned 6 to 12 inches (15 to 30 cm) above the foliage for 12 to 14 hours daily.
- Leaf Drop and Yellowing: This is the classic symptom of overwatering and root rot. If the lower leaves turn translucent, mushy, and easily slide off the stem, cease watering immediately. Unpot the plant, inspect the root system, trim away black, mushy, or foul-smelling roots with sterilized shears, and let the remaining healthy structure dry out for 5 days before repotting into fresh, dry soil.
- Mealybugs: These cottony, white, sap-sucking insects love hiding in the tight crevices between leaves and deep inside the core of the rosette. Treat infestations immediately by dipping a cotton swab in 70% isopropyl alcohol and physically touching each bug to dissolve its protective wax coating, followed by a thorough spray of horticultural insecticidal soap.
⚠️ Important Caution: Never use standard dormant oils or heavy horticultural oils on Echeveria species with heavy farina coatings. The oil will dissolve and permanently strip away the protective chalky powder, leaving unsightly dark splotches and making the plant acutely vulnerable to sunburn.

5. Frequently Asked Questions
Why are the bottom leaves of my Echeveria drying up and turning brown?
Natural leaf resorption is a normal part of the plant's growth cycle. As an Echeveria grows upward and produces new leaves at the crown, the oldest leaves at the very bottom will naturally exhaust their stored water, dry up into paper-thin husks, and drop off. You can gently pull these dried leaves away once they are completely crisp. However, if multiple leaves are yellowing and turning mushy simultaneously, you are likely overwatering.
How do I water Echeveria planted in closed terrariums or glass bowls?
You should not plant Echeveria in closed terrariums. These plants require high airflow and rapid soil drying to survive. Enclosed glass containers trap humidity, preventing evaporation and creating a stagnant, tropical microclimate that will rot an Echeveria's roots and crown within a week. Always grow Echeveria in containers with active drainage holes.
Can Echeveria survive winter outdoors?
Most Echeveria species are hardy only in USDA Zones 9 through 11, meaning they cannot tolerate sustained freezing temperatures below 30°F to 32°F (-1°C to 0°C). If you live in a cooler climate, you must bring your containerized Echeveria indoors before the first autumn frost and place them in a bright south-facing window or under grow lights for the winter months.
How often should I fertilize my Echeveria?
Echeveria are light feeders that thrive in nutrient-poor soils. Fertilize only during their active growing season in spring and early summer, using a balanced, water-soluble cactus and succulent fertilizer diluted to one-quarter strength. Apply this mixture once every 4 to 6 weeks. Withhold all fertilizer completely during autumn and winter when the plant enters dormancy.
📋 Table of Contents ▼ Click to expand
Tags:





