

Croton
Codiaeum variegatum
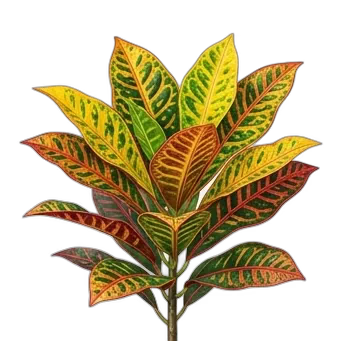
Years ago, while walking a gardener through a newly installed tropical courtyard in South Florida, I watched a freshly planted 'Petra' croton drop every single lower leaf within forty-eight hours of a sudden cold snap and an unexpected relocation. It was a humbling reminder that Codiaeum variegatum is an absolute drama queen when its environmental parameters shift. Kaleidoscopic evergreens, I have learned that mastering the croton is less about green thumbs and more about disciplined microclimate management.
1. Botanical Overview & Natural Habitat

In its native habitat, Codiaeum variegatum grows as a perennial shrub reaching heights of 6 to 10 feet (1.8 to 3 meters) with a comparable spread. The leaves are leathery, glossy, and remarkably variable—ranging from broad and oval to narrow, linear, corkscrew-twisted, or deeply lobed. What makes the croton globally celebrated is its revolutionary pigmentation. Due to varying concentrations of chlorophyll, carotenoids, and anthocyanins, a single plant can erupt in tones of neon yellow, fiery orange, deep crimson, magenta, purple, and rich emerald green.
As a member of the Euphorbiaceae family, every part of the plant contains a milky, latex-rich sap that can cause contact dermatitis in sensitive individuals and is toxic if ingested by household pets. Understanding this botanical lineage informs how we must treat the plant in domestic and landscape settings: it demands warmth, humidity, and bright, unfiltered energy to maintain its explosive color profile.
2. Essential Environmental & Care Requirements
Growing a vibrant croton indoors or in a subtropical landscape requires mirroring the constant warmth and high humidity of its native rainforest floor. When these conditions slip, the plant quickly signals its distress through leaf drop or fading pigments.
Light is the single most critical factor for Codiaeum variegatum. To achieve those trademark electric colors, these plants require a minimum of 6 to 8 hours of bright, direct sunlight daily. Placing a croton in a dim corner will result in new growth emerging as a dull, uniform green. Conversely, if you are transitioning a greenhouse-grown croton outdoors into intense summer sunlight, do so gradually over 14 days to prevent leaf scorch.
Temperature is equally unforgiving. Crotons thrive in ambient temperatures between 70°F and 85°F (21°C and 29°C). They experience severe physiological shock when exposed to temperatures dropping below 60°F (15°C) or subjected to cold drafts from air conditioning vents and winter windows.
Humidity must remain elevated, ideally between 50% and 80%. Indoor environments during heating seasons often drop below 30% relative humidity, which triggers rapid leaf abscission. Grouping plants together, running a cool-mist humidifier, or placing the container on a pebble tray filled with water will maintain the necessary moisture envelope.
| Parameter | Optimal Condition | Common Mistake | Why It Matters |
|---|---|---|---|
| Light | 6–8 hours of bright, direct light | Placing in low-light interior corners | Causes color fading and triggers lower leaf drop |
| Temperature | 70°F to 85°F (21°C to 29°C) | Exposing to drafts or below 60°F (15°C) | Induces cold shock and rapid defoliation |
| Humidity | 50% to 80% relative humidity | Leaving in dry, heated indoor air | Results in brown leaf tips and crispy margins |
| Soil pH | 5.5 to 6.5 (slightly acidic) | Planting in heavy, alkaline clay | Locks out iron and manganese, causing chlorosis |
Watering requires a delicate balance. The growing medium should be kept evenly moist during the active growing season (spring through summer), allowing only the top 1 to 2 inches (2.5 to 5 cm) of soil to dry out between waterings. During the dormant winter months, reduce watering frequency, allowing the top 3 inches (7.6 cm) to dry before rehydration.
For rigorous scientific data on plant physiological responses to environmental shifts, consult the Royal Horticultural Society guidelines on tropical shrub cultivation.
3. Step-by-Step Cultivation, Feeding & Propagation
Establishing a thriving croton starts with proper potting and soil selection. Because they demand consistent moisture paired with high oxygen levels at the root zone, a heavy garden soil will cause root rot.
Step-by-Step Planting and Repotting Protocol
- Select the Container: Choose a pot with unobstructed drainage holes that is only 2 inches (5 cm) wider in diameter than the current root ball. Crotons prefer a slightly root-bound state and resent oversized pots that retain excess moisture.
- Mix the Substrate: Formulate an airy, nutrient-rich potting medium by combining 2 parts high-quality peat-based potting soil, 1 part perlite or coarse horticultural sand, and 1 part orchid bark or compost to ensure rapid drainage and aeration.
- Establish the Planting Depth: Position the croton in the container so that the top of the root ball sits exactly 0.5 to 1 inch (1.3 to 2.5 cm) below the rim of the pot, ensuring the stem is buried at the exact same depth it was previously growing.
- Initial Watering: Water the newly potted specimen thoroughly until water runs freely from the drainage holes. Allow the pot to drain completely for 30 minutes before returning it to its saucers.
- Feed Strategically: Begin a regular fertilization schedule 30 days after repotting. Apply a balanced, slow-release granular fertilizer or a water-soluble formula rich in micronutrients (specifically iron and magnesium) at half-strength every 4 weeks throughout spring and summer. Withhold all fertilizer from October through February.
Propagation is best achieved in late spring using stem cuttings. Select a healthy, pest-free terminal stem measuring 4 to 6 inches (10 to 15 cm) in length. Using sterilized pruning shears, make a clean cut just below a leaf node. Dip the cut end in rooting hormone powder and insert it into a propagation medium of equal parts perlite and peat moss at a depth of 2 inches (5 cm). Maintain a high humidity environment by covering the cutting with a clear plastic bag, keeping the medium consistently warm at 75°F to 80°F (24°C to 27°C). Roots typically form within 21 to 35 days.
💡 Pro-Tip: When propagating croton cuttings, you will notice the milky sap oozing from the cut stem. Always dab the cut end with lukewarm water or let it callous for 30 minutes before applying rooting hormone. If you skip this step, the coagulating sap creates a barrier that prevents the rooting hormone from penetrating the plant tissues, drastically lowering your success rate.
⚠️ Important Caution: The milky latex sap of Codiaeum variegatum is a skin irritant and toxic to cats and dogs. Always wear gloves when pruning, repotting, or taking cuttings, and immediately wipe down your workstation to protect curious pets and family members.
4. Common Problems, Pests & Troubleshooting
Even with meticulous care, crotons can occasionally present diagnostic challenges. Recognizing the symptoms early prevents minor issues from becoming fatal.
- Massive Leaf Drop: If your croton is dropping leaves seemingly overnight, look at recent environmental changes. This is the plant's classic reaction to drafts, sudden temperature drops, or moving from high outdoor light to a dim indoor room. Stabilize its location immediately.
- Spider Mites (Tetranychus urticae): These microscopic pests thrive in warm, dry indoor air. Look for fine webbing on the undersides of leaves and a stippled, dusty appearance on the foliage. Treat infestations by wiping leaves down with insecticidal soap or neem oil every 7 days for a 3-week cycle.
- Mealybugs: Appearing as small, cottony white masses in leaf axils and stems, mealybugs feed on plant sap. Dab individual pests with a cotton swab soaked in 70% isopropyl alcohol, followed by a thorough application of horticultural oil.
- Root Rot (Phytophthora or Pythium): Caused by overwatering or compacted, poorly draining soil. Symptoms include wilting despite wet soil, black mushy stems at the soil line, and foul-smelling roots. Salvage the plant by unpotting, trimming away all dead black roots with sterilized shears, and repotting into fresh, dry medium.

5. Frequently Asked Questions
Why are the new leaves on my croton growing in completely green without any yellow or red variegation?
Your croton is not receiving enough light. The vivid pigments that make Codiaeum variegatum famous require intense, direct light to synthesize. Move your plant to a south- or west-facing window where it can receive at least 6 hours of direct sun daily.
How do I stop my croton from dropping its lower leaves every autumn?
Seasonal indoor leaf drop is usually triggered by a combination of dropping indoor temperatures, shortened day lengths, and a significant decrease in relative humidity caused by indoor heating systems. Mitigate this by placing the plant in the brightest room possible, running a room humidifier to keep humidity above 50%, and keeping it away from drafty doors and heating vents.
Can I prune a leggy croton to make it bushier?
Yes. Crotons respond exceptionally well to pruning. Cut back leggy stems in early spring just above a leaf node using sterilized shears. This breaks apical dominance and stimulates dormant lateral buds lower down on the stem, resulting in a much fuller, bushier specimen within 6 to 8 weeks.
Is it safe to put my indoor croton outside for the summer?
Absolutely. Transitioning your croton outdoors for the warm summer months is a fantastic way to boost its color intensity and overall vigor. However, you must wait until nighttime temperatures consistently remain above 65°F (18°C), and you must acclimate the plant to direct outdoor sun over a 14-day period by gradually increasing its daily sun exposure to prevent severe leaf burn.
📋 Table of Contents ▼ Click to expand
Tags:





