

Flamingo Flower
Anthurium andraeanum
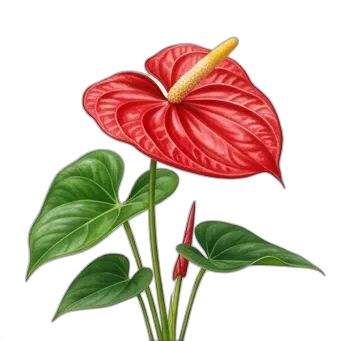
The morning sunlight hit the waxy, coral-pink spathe of the Anthurium andraeanum sitting on a greenhouse bench, illuminating a tiny, bead-like drip of guttation fluid at its very tip. It was my third year nursing this particular specimen through a damp, unpredictable British winter, and that single bead of moisture told me everything I needed to know: my root-zone temperature was precisely where it needed to be, the humidity was holding above 65%, and the coarse orchid bark blend I had mixed six months prior was finally breaking down into the exact microbial balance the plant craved. I view the Flamingo Flower not as a fleeting holiday novelty, but as a resilient, tropical epiphyte that rewards botanical precision with months of continuous, sculptural bloom.
1. Botanical Overview & Natural Habitat

Understanding this evolutionary background is the single most important step in mastering its cultivation. The striking, heart-shaped structure that most people mistake for a flower is actually a modified leaf called a spathe, which comes in brilliant shades of crimson, pink, coral, white, and bi-colored variations. Protruding from the center of this spathe is the true inflorescence: a cylindrical structure called a spadix, densely packed with dozens of microscopic, bisexual flowers.
In a domestic or conservatory landscape, Anthurium andraeanum functions as a striking specimen plant. Its dark green, leathery leaves grow anywhere from 8 to 15 inches (20 to 38 cm) long on stiff petioles, providing year-round architectural interest even when the plant takes a brief physiological rest from producing its signature spathes, which can last up to 8 weeks per cycle under optimal environmental conditions.
2. Essential Environmental & Care Requirements
Replicating the equatorial understory in a domestic or office setting requires precise management of light, water, temperature, and atmospheric moisture. Let us examine the empirical parameters required to keep your Anthurium andraeanum thriving.
| Parameter | Optimal Condition | Common Mistake | Why It Matters |
|---|---|---|---|
| Light | Bright, indirect light (10,000 to 15,000 lux) | Direct midday sun | Leaves scorch, bleaching the waxy spathes and causing irreversible tissue necrosis. |
| Temperature | 70°F to 85°F (21°C to 29°C) daytime | Exposing to drafts below 55°F (13°C) | Temperatures below 55°F halt metabolic activity and trigger root rot due to slow uptake. |
| Humidity | 60% to 80% relative humidity | Indoor air dropping below 40% | Low humidity causes crispy leaf tips, bud blast, and stunted, deformed spathes. |
| Watering | Water thoroughly when top 1 to 2 inches (2.5 to 5 cm) dry | Keeping soil constantly soggy | Suffocates epiphytic roots, leading to Pythium and Phytophthora root rot pathogens. |
Light and Exposure
Anthuriums demand high quantities of ambient light, but it must be strictly indirect. Position your plant within 3 to 5 feet (0.9 to 1.5 m) of an east-facing window, or slightly set back from a bright unobstructed south- or west-facing window protected by a sheer curtain. Insufficient light is the primary reason anthuriums fail to re-bloom; if your plant produces lush green foliage but zero spathes, it is starving for photons.
Temperature and Airflow
Maintain ambient temperatures between 70°F and 85°F (21°C and 29°C) during the active growing season, allowing for a mild nocturnal drop of no more than 10°F (5°C). Avoid placing the plant near uninsulated windows in winter or directly in the path of forced-air heating vents. For deeper insight into tropical plant environmental tolerances, you can consult resources provided by the Royal Botanic Gardens, Kew.
Humidity Management
Because these plants absorb ambient moisture through their leaves and exposed root systems, relative humidity should ideally be maintained between 60% and 80%. Grouping plants together, utilizing an ultrasonic humidifier, or placing the pot upon a wide pebble tray filled with water (ensuring the base of the pot never touches the standing water) will drastically improve tissue integrity.
💡 Pro-Tip: Never rely solely on misting to raise humidity for Anthurium andraeanum. Misting only raises ambient humidity for roughly 3 to 5 minutes and leaves stagnant water droplets on the leaf surface, which acts as a breeding vector for bacterial leaf spot (Xanthomonas campestris). Use a hygrometer to track your space accurately and invest in a dedicated mechanical humidifier if indoor levels drop below 50%.
3. Step-by-Step Cultivation, Feeding & Propagation
Planting and propagating anthuriums requires materials that mimic coarse, highly aerated tropical bark rather than dense, heavy garden loam. When potting, construct a bespoke medium utilizing 40% chunky orchid bark (0.25 to 0.5 inches / 0.6 to 1.2 cm), 30% high-grade sphagnum moss, 20% horticultural perlite, and 10% worm castings for initial microbial support.
Step-by-Step Repotting and Division Protocol
- Select the Proper Container: Choose a pot only 1 to 2 inches (2.5 to 5 cm) wider in diameter than the current root ball. Terracotta pots are exceptional because they allow rapid gas exchange around the root zone, though plastic nursery pots work well if the soil mix is exceptionally chunky.
- Unpot and Inspect the Root System: Gently ease the plant out of its container. Use your fingers to tease away old, compacted peat or soil from the root mass. Rinse the roots gently under lukewarm water to expose any brown, mushy, or decaying roots, and sterilize your snips with isopropyl alcohol before trimming those dead roots away.
- Position the Plant: Place a layer of your bark-heavy medium at the bottom of the pot. Position the plant so that the crown sits slightly above the soil line. Burying the stem or crown too deeply invites stem rot.
- Fill and Secure: Backfill with your coarse medium, working it gently between the thick, brittle roots with a blunt stick or your fingers. Do not pack the medium down tightly; the roots require massive air pockets to thrive.
- Initial Watering: Water the newly potted anthurium thoroughly until it runs freely through the drainage holes. Add a quarter-strength rooting hormone or kelp extract to this initial watering to minimize transplant shock.
- Post-Repotting Recovery: Place the plant in bright, indirect light with high humidity (70%+) and withhold all fertilizer for 4 to 6 weeks while the root system re-establishes itself in the fresh medium.
Fertilization Regime
Feed your Flamingo Flower actively from early spring through late summer using a balanced, water-soluble liquid fertilizer formulated for blooming houseplants, diluted to one-quarter or one-half strength. Apply this every 3 to 4 weeks during watering. Crucially, look for a fertilizer with a higher phosphorus ratio (the middle number on the N-P-K label, e.g., 10-20-10) to encourage robust spathe development, and flush the potting medium with pure, unfertilized water every third watering to prevent mineral salt accumulation.
⚠️ Important Caution: All parts of Anthurium andraeanum contain microscopic, needle-like calcium oxalate crystals (raphides). If ingested by curious cats, dogs, or small children, these crystals cause immediate, intense burning, irritation of the lips, tongue, and throat, and excessive salivation. Keep your Flamingo Flower elevated and safely out of reach of household pets.
4. Common Problems, Pests & Troubleshooting
Even with meticulous care, environmental stressors or microscopic interlopers can compromise your plant's health. Identifying symptoms early allows for rapid corrective action.
- Yellowing Lower Leaves (Chlorosis): If older leaves turn uniformly yellow and drop, you are likely overwatering or the potting medium has broken down and lost its aeration. Check the roots; if they are brown and stringy, cut away the rot, reduce watering frequency, and repot into fresh bark mix.
- Brown Leaf Tips and Margins: This is almost universally caused by low humidity, underwatering, or a buildup of fluoride and chlorine salts from tap water. Switch to rainwater, distilled water, or reverse-osmosis water, and boost ambient humidity.
- Failing to Bloom: If your plant is putting out healthy green growth for more than 12 months without a single spathe, it is experiencing a light deficit or a lack of phosphorus. Move it closer to a bright window and introduce a bloom-boosting fertilizer.
- Pest Infestations (Spider Mites, Thrips, Mealybugs): Low humidity combined with stagnant indoor air frequently invites spider mites (manifesting as fine webbing and stippled, dusty leaves) or thrips (leaving silver streaks and black fecal specks). Wipe down leaves immediately with a horticultural insecticidal soap or neem oil emulsion, ensuring you coat the undersides of the leaves and leaf axils thoroughly. Repeat every 7 days for a 21-day cycle to break the pest reproductive timeline. For comprehensive pest management frameworks, reference the guidelines provided by the University of Florida IFAS Extension.

5. Frequently Asked Questions
How often should I water my Flamingo Flower?
Water your Anthurium andraeanum when the top 1 to 2 inches (2.5 to 5 cm) of the potting medium feel completely dry to the touch. In a warm home during summer, this is typically every 7 to 10 days; in winter, as metabolic rates slow down, this interval often extends to every 14 to 21 days. Always check the soil moisture manually rather than sticking to a rigid calendar schedule.
Can I propagate my Anthurium by cutting the stems?
Yes, but standard stem cuttings can be tricky because anthuriums do not readily form nodes along smooth stems the way vining aroids do. The safest and most reliable method of propagation is division. When repotting in spring, carefully pull or cut apart natural offsets (pups) that have developed their own independent root systems and at least two to three leaves, then pot them up individually in standard epiphyte mix.
Why are the flowers on my plant turning green?
As anthurium spathes age, their pigments naturally degrade and chlorophyll reasserts itself, causing vibrant pink, red, or coral spathes to take on a greenish hue before they eventually fade and dry out. This is a normal part of the senescence cycle and indicates that the individual bloom is simply reaching the end of its lifespan (which typically spans 4 to 8 weeks).
What causes black spots on anthurium leaves?
Black or dark brown spots surrounded by a yellow halo are typically a symptom of bacterial leaf spot, caused by Xanthomonas species splashing from leaf to leaf during overhead watering. Immediately prune off the heavily affected leaves, discard them in the trash, stop misting the plant entirely, and ensure good cross-ventilation with a small oscillating fan to keep the foliage dry.
📋 Table of Contents ▼ Click to expand
Tags:





