

Can Beets Be Transplanted — Complete Care, Planting & Growth Masterclass
Written with AI assistance, edited and checked against horticultural sources.
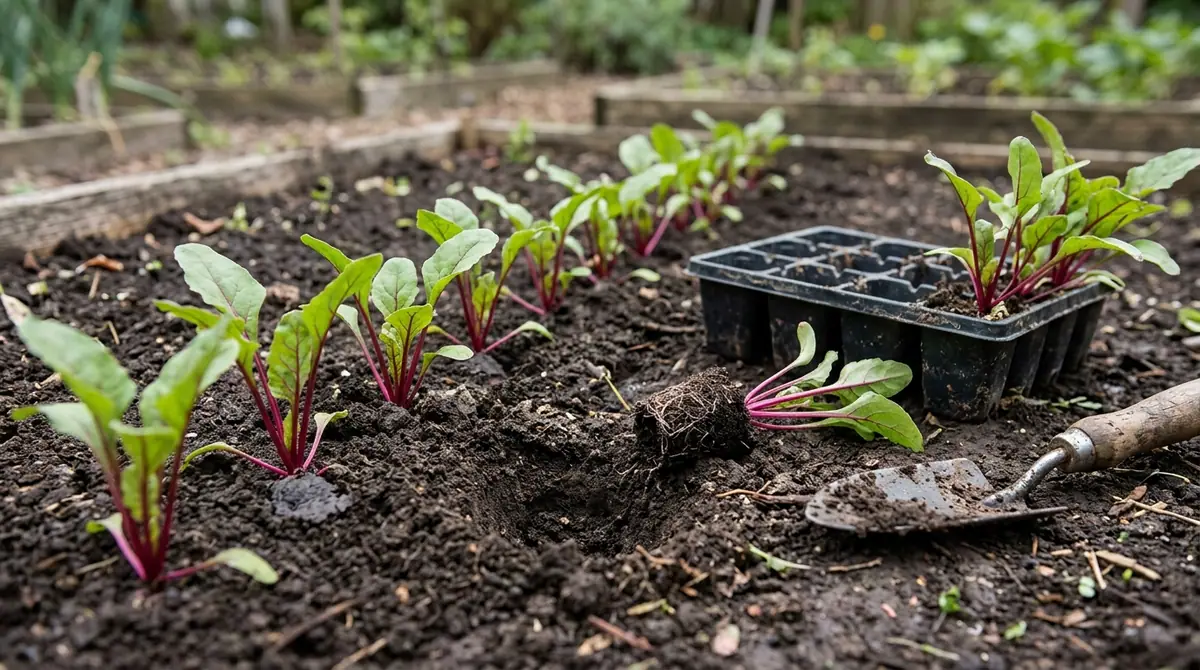
Transplanting beet seedlings successfully requires understanding specific nuances, as starting them indoors and moving them can lead to mixed results where some thrive while others struggle.

Let's dive deep into how to ensure your beet transplants not only survive but thrive!
1. Botanical Overview & Natural Habitat
Beets, scientifically known as Beta vulgaris, are fascinating biennials typically grown as annuals for their edible roots and leaves. They belong to the Amaranthaceae family, which also includes spinach and quinoa. In their natural, undisturbed cycle, beets would grow for one season, produce a flower stalk, and then go to seed in their second year. For us gardeners, we harvest them before this reproductive stage, aiming for plump roots and tender greens.
The ideal environment for beets mirrors their ancestral growing conditions: cool weather, fertile soil, and consistent moisture. They are cool-season crops, meaning they prefer temperatures between 50-70°F (10-21°C). While they can tolerate warmer conditions, prolonged heat can cause them to bolt (prematurely flower) and can also affect root development, making them woody or less sweet.
Understanding their biology is key to successful cultivation and, importantly, to understanding why transplanting them requires specific techniques. Their root system is designed for direct growth in a stable environment. When disturbed, especially after the root has begun to enlarge, it can lead to stress, reduced vigor, and a smaller harvest. However, with careful handling and timing, we can mitigate these risks.
Essential Quick Facts & Biological Overview
- Core Topic: Can Beets Be Transplanted
- Difficulty Rating: Easy (with proper technique)
- Recommended Soil pH: 6.0 – 6.8 (Slightly acidic to neutral, rich in organic matter and micro-nutrients)
- Sunlight Requirements: Full Sun (6+ hours) to Partial Afternoon Shade (especially in hotter climates)
- Moisture Management: Deep, infrequent irrigation to promote resilient root architecture and prevent waterlogging.
2. Essential Environmental & Care Requirements
Just like any plant, beets have specific needs to flourish. Meeting these requirements is the foundation for healthy growth, and it’s even more critical when you’re considering transplanting.
Soil Preparation and Root Health
Healthy plants start below the ground. For beets, this means loose, well-drained soil that allows for unobstructed root development. I always aim for a soil mix that contains a balanced blend of compost for nutrients and structure, perlite or coarse sand for excellent aeration, and if possible, some organic worm castings to introduce beneficial microbes. Why is this so important? Compacted, waterlogged soils are a breeding ground for root rot and fungal pathogens, which can severely damage or kill your beet seedlings, especially after the stress of transplanting. The ideal soil provides ample oxygen to the roots and prevents them from becoming suffocated.
Environmental & Climate Optimization
Temperature fluctuations are a major stressor for young plants, and beets are no exception. If you’re transplanting seedlings, ensure the nighttime temperatures are consistently above 40°F (4°C) and ideally not soaring above 75°F (24°C) during the day. Sudden temperature drops can induce shock, slowing growth, while extreme heatwaves can cause wilting and stress. Monitor your USDA Plant Hardiness Zone and your local weather forecasts diligently. In cooler regions, this means waiting until the last frost has passed. In hotter climates, providing some shade netting during the peak of summer can be beneficial. For indoor-started seedlings, gradually acclimatize them to outdoor conditions (a process called hardening off) over 7-10 days before transplanting.
Sunlight Requirements
Beets are sun-lovers! They generally thrive in full sun, which means at least 6-8 hours of direct sunlight per day. This intense light fuels their photosynthetic processes, leading to robust growth and sweet roots. However, in regions with very hot summers, where the sun can be scorching in the afternoon, partial afternoon shade can actually be beneficial. This can help prevent heat stress and keep the soil cooler. If you're growing in containers, ensure they are placed in a location that receives ample light, rotating them if necessary to ensure even growth.
Moisture Management
Consistent moisture is crucial, but "consistent" doesn't mean "constant." Beets prefer deep, infrequent irrigation. This encourages the roots to grow deeper in search of water, building a more resilient root architecture. Water thoroughly until water drains from the bottom of pots or the soil is moist several inches down in the garden bed. Allow the top inch or two of soil to dry out slightly between waterings. Overwatering is a common pitfall, especially in containers. Waterlogged soil deprives roots of oxygen and can lead to fungal diseases. Always check the moisture level before watering – stick your finger into the soil about 2 inches deep. If it feels moist, hold off.
Nutrient Cycling & Organic Fertilization
A balanced approach to feeding is essential for optimal beet growth. Before planting or transplanting, incorporate well-rotted compost into your soil. This provides a slow-release source of nutrients and improves soil structure. As the plants begin to establish their root systems and approach their reproductive (flowering) stage, they benefit from a boost. I recommend applying a high-phosphorus organic blend, such as bone meal or a balanced organic fertilizer, during root establishment and bud formation. This encourages strong root development. As the plants mature and focus on bulking up their roots, transitioning to a potassium-rich amendment like kelp meal becomes beneficial. Potassium is vital for enhancing cellular wall strength, which can improve drought tolerance and overall plant vigor, leading to sweeter, better-formed roots.
Here’s a quick summary of key parameters for success:
| Parameter | Optimal Condition | Common Mistake | Why It Matters |
|---|---|---|---|
| Soil pH | 6.0 – 6.8 | Soil too acidic or alkaline | Affects nutrient availability and uptake by the plant. |
| Temperature | 50-70°F (10-21°C) for growth, avoid extremes | Planting in soil too cold or too hot, severe fluctuations | Stress, bolting, poor root development, susceptibility to disease. |
| Sunlight | 6-8+ hours direct sun | Too much shade or intense afternoon sun in hot climates | Insufficient light leads to stunted growth; excessive heat can scorch leaves and toughen roots. |
| Watering | Deep, infrequent; allow top 1-2 inches to dry | Overwatering or inconsistent watering | Overwatering causes root rot; underwatering stresses the plant, leading to woody or small roots. |
| Soil Type | Loose, well-drained, rich in organic matter | Heavy clay or compacted soil | Poor root penetration, lack of aeration, waterlogging, increased disease risk. |
| Fertilization | Balanced organic, with P boost at establishment, K at maturity | Over-fertilizing, especially with nitrogen | Excess nitrogen promotes leafy growth at the expense of root development; nutrient imbalances. |
| Transplant Timing | Seedlings with 2-4 true leaves; small root ball | Transplanting large plants or when root is established | Excessive root disturbance leads to transplant shock and significantly reduced yield. |
3. Step-by-Step Cultivation, Feeding & Propagation
So, can beets be transplanted? Yes, but it’s all in the execution! Here's how to do it right.
Beets are typically sown directly into the garden. However, if you want an earlier start, want to grow them in containers, or need to thin overcrowded seedlings, transplanting is an option.
Starting Seeds Indoors (for Transplanting)
- Timing: Start seeds indoors about 3-4 weeks before your last expected frost date, or at any time if you plan to transplant them into containers or a succession planting.
- Container Choice: Use small pots (2-3 inches or 5-7.5 cm in diameter) or seed trays with individual cells. Ensure they have drainage holes.
- Seed Starting Mix: Use a light, sterile seed-starting mix.
- Sowing: Plant 2-3 seeds per cell or pot, about 1/2 inch (1.25 cm) deep. Beet seeds are technically clusters, so you might get multiple seedlings from one "seed."
- Watering: Moisten the mix thoroughly. Keep it consistently moist but not waterlogged. A humidity dome or plastic wrap can help maintain moisture until germination.
- Light & Temperature: Place trays in a warm spot (70-75°F or 21-24°C) until germination. Once seedlings emerge, move them to a bright location with at least 6-8 hours of fluorescent or grow light exposure daily. Cooler temperatures (60-70°F or 15-21°C) are fine once they've sprouted.
- Thinning Seedlings: Once seedlings have their first set of true leaves (the leaves that look like miniature beet leaves, not the initial round cotyledons), thin them to one strong seedling per cell/pot. You can try transplanting the thinned seedlings, but success is better with those intentionally grown for transplanting.
Preparing for Transplanting
- Harden Off: About 7-10 days before transplanting outdoors, gradually expose your indoor-started seedlings to outdoor conditions. Start with a few hours in a sheltered spot and progressively increase the time and exposure to sun and wind. This is crucial to prevent transplant shock.
- Choose the Right Time: Transplant on a cool, overcast day or in the late afternoon/early evening. This minimizes heat and sun stress on the young plants.
- Prepare the Garden Bed: Ensure your garden bed is well-prepared with loose, fertile soil as described in section 2. If planting in containers, use a good quality potting mix with added compost and perlite, ensuring the container is large enough (at least 8-10 inches or 20-25 cm deep).
The Transplanting Process
- Water Seedlings: Water your seedlings thoroughly about an hour before you plan to transplant them. This helps keep the soil together around the roots.
- Gentle Removal: Carefully tip the pot or cell to slide the seedling out. If multiple seedlings are in one pot, gently tease them apart if possible, trying to keep as much soil as possible around each root. If they are too tangled, it's often better to sacrifice one or two to save the others, or choose the strongest one to keep.
- Dig the Hole: In the prepared garden bed or container, dig a hole slightly larger than the seedling's root ball.
- Planting Depth: Plant the seedling at the same depth it was growing in its original container. Avoid planting too deep, as this can lead to stem rot.
- Backfill and Gently Firm: Fill the hole with soil, gently firming it around the base of the plant to eliminate air pockets.
- Water In: Water thoroughly immediately after transplanting. This settles the soil and helps the roots make contact with the surrounding soil.
- Protection: If extreme heat or cold is expected, provide temporary shade with a cloche, a piece of cardboard, or shade cloth for a few days.
Ongoing Care Post-Transplant
- Watering: Continue with deep, infrequent watering.
- Mulching: Apply a layer of organic mulch (like straw or shredded leaves) around the plants once they are established. This helps retain soil moisture, suppress weeds, and regulate soil temperature.
- Fertilizing: If you didn't incorporate a balanced organic fertilizer into the soil beforehand, you can apply a diluted liquid organic fertilizer (like fish emulsion or kelp extract) about 2-3 weeks after transplanting, once you see signs of new growth. Avoid high-nitrogen fertilizers, which can lead to excessive leafy growth at the expense of root development.
4. Common Problems, Pests & Troubleshooting
Even with the best intentions, things can go awry. Knowing what to look for will help you address issues quickly.
Wilting: This is the most common sign of transplant shock. If it’s due to heat, provide shade and ensure consistent moisture. If it’s from root damage during transplanting, be patient; if the roots are intact, the plant should recover within a few days. Ensure the soil isn't waterlogged, as this can mimic wilting but indicates a different problem.
Slow Growth: If your transplanted beets are not showing signs of new growth within a week or two, check the soil temperature and moisture. If they are too cold or too dry, growth will be slow. Ensure they are receiving adequate light. Sometimes, beets just need time to recover from the transplanting stress.
Leaf Yellowing: This can indicate a nutrient deficiency. If your soil was poor or you didn't fertilize, a light feeding with a balanced organic fertilizer or compost tea can help. Make sure the pH is correct (6.0-6.8); if it's too far out of range, the plant can't absorb nutrients even if they are present.
Root Maggots: These tiny, white larvae bore into the roots, causing stunted growth and damage. They are often attracted to newly planted seedlings. Row covers can help prevent adult flies from laying eggs.
Fungal Diseases (e.g., damping-off, root rot): These are often caused by overwatering and poor drainage. Ensure good soil aeration and avoid waterlogged conditions. Remove any diseased plants immediately to prevent spread.
Bolting: If temperatures rise too high too quickly, or if the plant experiences significant stress (like severe underwatering or transplant shock), it may send up a flower stalk prematurely. Harvest the beet while it's still young.
💡 Pro-Tip: When transplanting seedlings, especially if they seem to be struggling, I often add a little mycorrhizal inoculant to the planting hole. These beneficial fungi form a symbiotic relationship with the plant's roots, helping them absorb water and nutrients more efficiently and promoting faster recovery from transplant shock.
⚠️ Important Caution: Never transplant beet seedlings if they have already started to form a noticeable root bulb. The larger the root, the more sensitive it is to disturbance. It’s best to transplant when they are young, typically with 2-4 true leaves and a relatively small, developing root system. For direct-sown beets that you need to thin, gently pull out excess seedlings, trying not to disturb the roots of the ones you want to keep.

5. Frequently Asked Questions
Can I transplant beets that have been growing in the garden for a month?
It's generally not recommended to transplant beets that have been growing in the garden for a month, especially if they have started to develop a noticeable root. The longer they've been in place, the more established and sensitive their root system becomes. The stress of transplanting will likely outweigh any benefits, leading to significantly reduced yield or even plant death. It's best to transplant beets when they are young seedlings, usually with 2-4 true leaves and before the root bulb starts to form.
What's the biggest sign my transplanted beets are struggling?
The most common sign that your transplanted beets are struggling is wilting that doesn't resolve even after watering, or persistent drooping of the leaves. If the leaves turn yellow or develop brown, crispy edges, it indicates severe stress. However, some temporary wilting right after transplanting is normal, especially if it's sunny or warm. The key is to observe if they perk up within 24-48 hours.
How deep should I plant beet seedlings when transplanting?
You should plant beet seedlings at the same depth they were growing in their original container or seed tray. The base of the stem where it meets the root should be at the soil surface. Planting too deep can lead to rot, while planting too shallow can expose the root and cause it to dry out. Gently firm the soil around the root ball to ensure good soil-to-root contact.
Is it better to sow beets directly or transplant them?
For most home gardeners, sowing beets directly into the garden is the easiest and most reliable method. Beets develop best when their roots are undisturbed. However, transplanting can be useful if you want to start seeds indoors for an earlier harvest, if your outdoor planting conditions are poor, or if you need to thin crowded seedlings and want to salvage the extras. Success hinges on careful timing and gentle handling.
Will transplanting affect the taste or size of my beets?
Yes, transplanting can potentially affect both the taste and size of your beets. The stress of transplanting can slow down growth and development, potentially leading to smaller roots. If the plant experiences significant shock or set-back, the root may also become tougher or less sweet as it struggles to recover. Direct-sown beets, which experience no root disturbance, generally grow larger and have a more consistent, sweeter flavor profile. However, if done correctly, the impact on transplanted beets can be minimized.
For more authoritative gardening advice, consult resources like Penn State Extension — Gardening or the RHS Gardening Advice.
Happy growing, everyone!
Tags:
Keep reading
🌿 Related Plants You Might Like






PlantSavvyWorld
Editorial team
PlantSavvyWorld is an independent botanical education project. Articles are drafted with AI assistance, then edited and checked against university extension services, botanical garden collections and other published horticultural sources.